Unreal 5 Base Setup
Project Setup
- Create a new project in
- Create the below folder structure in the Unreal Contenet Browser.
Folder Structure
.
Content/
└── LSUBaseTemplateProject/
    ├── Assets/
    ├── Scenes/
    │   └── SceneName1
    └── Stage/
        ├── SM_LSUXRStudio_CurvedWall
        ├── NDC_LSUXRStudio
        ├── LLP_LSUXRStudio
        └── OCIO_LSUXRStudio
Note
Based on the complexity of the project you may choose to use a more detailed folder structure such as one of these. The idea here is that sublevels are used to seperate content. For instance, in the "Basic Sublevel Folder Structure" below LSUXRStudio_Stage is a sublevel of SceneName1. In the "Advanced Sublevel Folder Strucutre" LSUXRStudio_Stage and SceneName1_P are sublevels of SceneName1_LSUXRStudio.
Basic Sublevel Folder Structure
Content/.
└── LSUBaseTemplateProject/
    ├── Assets/
    ├── Scenes/
    │   └── SceneName1
    └── Stage/
        ├── LSUXRStudio_Stage
        ├── LEDMesh/
        │   └── SM_LSUXRStudio_CurvedWall
        └── Configs/
            ├── NDC_LSUXRStudio
            ├── LLP_LSUXRStudio
            └── OCIO_LSUXRStudio
Intermediate Sublevel Folder Structure
Content/
└── LSUBaseTemplateProject/
    ├── Assets/
    ├── Scenes/
    │   └── SceneName1/
    │       └── SceneName1
    ├── StageLevels/
    │   └── SceneName1_LSUXRStudio
    └── Stage/
        ├── LSUXRStudio_Stage
        ├── LEDMesh/
        │   ├── SM_LSUXRStudio_CurvedWall
        │   ├── M_LSUXRStudio_CurvedWall
        │   └── T_LSUXRStudio_CurvedWall
        └── Configs/
            ├── NDC_LSUXRStudio
            ├── LLP_LSUXRStudio
            └── OCIO_LSUXRStudio
Advanced Sublevel Folder Structure
Content/
└── LSUBaseTemplateProject/
    ├── Assets/
    │   ├── Atlases/
    │   ├── Decals/
    │   ├── FX/
    │   ├── Landscape/
    │   ├── Materials/
    │   ├── Props/
    │   ├── Sky/
    │   └── Textures/
    ├── Scenes/
    │   └── SceneName1/
    │       ├── SceneName1_P
    │       ├── Sublevels/
    │       │   ├── SceneName1_Geo_A
    │       │   ├── SceneName1_Lighting_A
    │       │   ├── SceneName1_FX_A
    │       │   ├── SceneName1_Anim_A
    │       │   ├── SceneName1_Vis_A
    │       │   └── SceneName1_Caustics_A
    │       └── Snapshots/
    │           ├── SNAP_SceneName1_LSUXRStudio_SetupA
    │           └── SNAP_SceneName1_LSUXRStudio_SetupB
    ├── Media/
    │   ├── Bundles/
    │   ├── Proxies/
    │   ├── MediaOutputs/
    │   ├── MediaProfiles/
    │   └── MediaSources/
    ├── Sequences/
    │   ├── Edits/
    │   └── SN1/
    │       ├── Takes
    │       ├── Shots
    │       ├── Previz
    │       ├── Techviz
    │       ├── Edits
    │       └── Sublevels
    ├── StageLevels/
    │   ├── SceneName1_LSUXRStudio
    │   ├── SceneName2_LSUXRStudio
    │   └── SceneName3_LSUXRStudio
    └── Stage/
        ├── LSUXRStudio_Stage
        ├── LEDMesh/
        │   ├── SM_LSUXRStudio_CurvedWall
        │   ├── M_LSUXRStudio_CurvedWall
        │   └── T_LSUXRStudio_CurvedWall
        ├── Config/
        │   └── NDC_LSUXRStudio
        ├── LiveLinkPresets/
        │   └── LLP_LSUXRStudio
        ├── OCIO/
        │   └── OCIO_LSUXRStudio
        └── RemoteControl/
            └── CP_LSUXRStudio
- Enable Plugins.
Creating Wall Geometry
- Create wall in DCC
- Import into project
Original Guide
Setting Up Project

How to create an Unreal project from scratch in Unreal 5.X.X for an in-camera virual production using LSU's equipment in their XR lab in room 1001 at the DMC.
Guide To Do's:
- [ ] Remember to re-initialitze timecode and genlock and verify it's working via stat command.
- [ ] add sync policy set to nvidia
- [ ] add cvars from: https://docs.unrealengine.com/5.1/en-US/in-camera-vfx-production-test-sample-project-for-unreal-engine/
- [ ] add dervied data cache setup. Add the following to DefaultEngine.ini
[InstalledDerivedDataBackendGraph] Shared=(Type=FileSystem, ReadOnly=false, Clean=false, Flush=false, DeleteUnused=true, UnusedFileAge=10, FoldersToClean=10, MaxFileChecksPerSec=1, ConsiderSlowAt=70, PromptIfMissing=false, Path="X:\DerivedDataCache", EnvPathOverride=UE-SharedDataCachePath, EditorOverrideSetting=SharedDerivedDataCache). Replce the Path parameter with a mapped drive on the network.
Step 1.
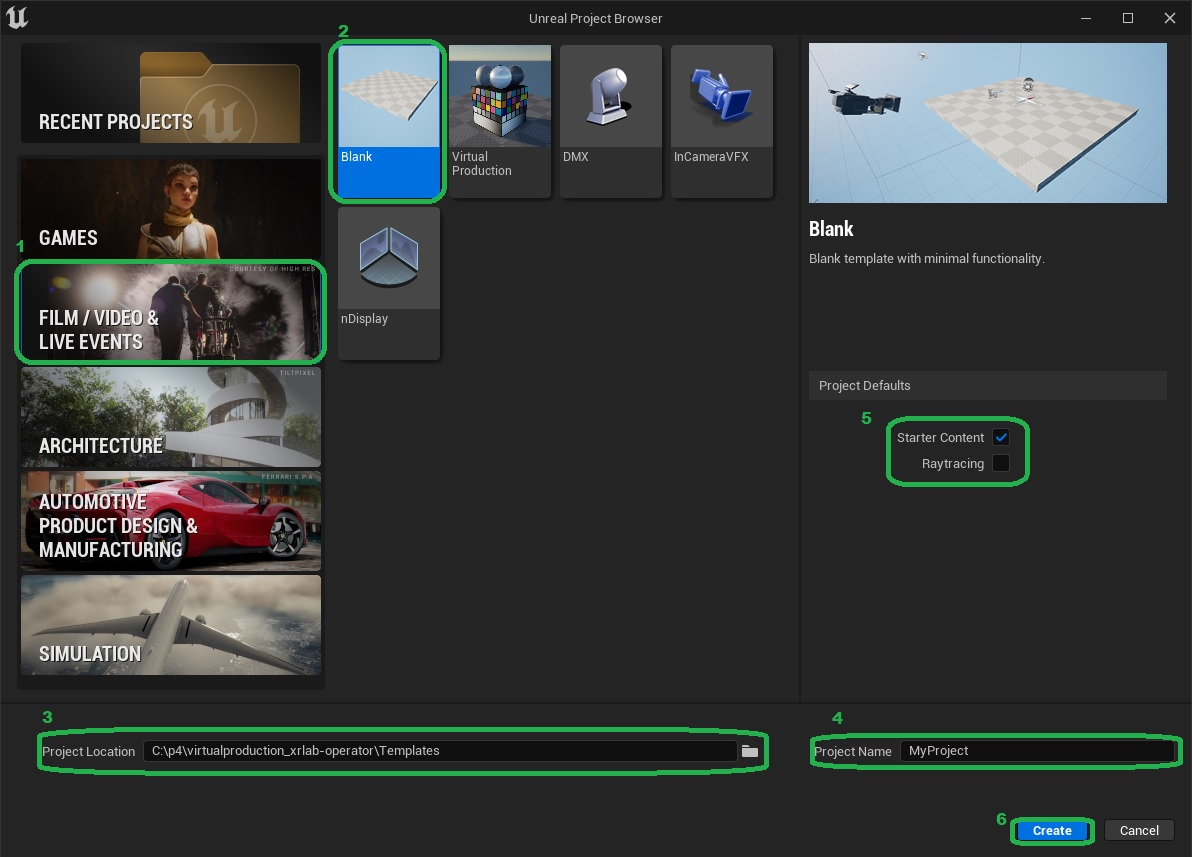
Run the Epic Games Launcher and run the latest version of Unreal. Selet the Film / Video & Live Events project category. Select a Blank template. Select a directory to save the project to and give the project a name. I named mine My Project. Select a Blank project. I selected No Starter Content and we will use Lumen instead of Ray Tracing as no special hardware is required. Press the Create button.
Step 2.
We need to download two external plugins. OptiTrack for the Live Link support in Motive that handles camera tracking. For focus we are using LOLED Indie Mark[] encoders which require a server to be installed as well as a plugin for Unreal Lonet 2 - Live Link.

Step 3.
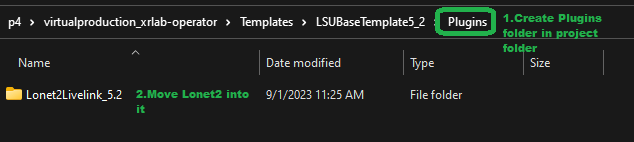
Place them in the project folder under a new directory called Plugins.
Step 4.
Open up Edit | Plugins and enable the ICVFX plugin. This plugin is a collection of other virtual production related plugins that are needed.
Also double check that the following plugins are enabled: LONET2 Plugin, OptiTrack - Live Link, and OptiTrack - Streaming Client. They should be already enabled since they are included in the Plugins director.
You will need to restart the engine for this to take place.
Step 5.
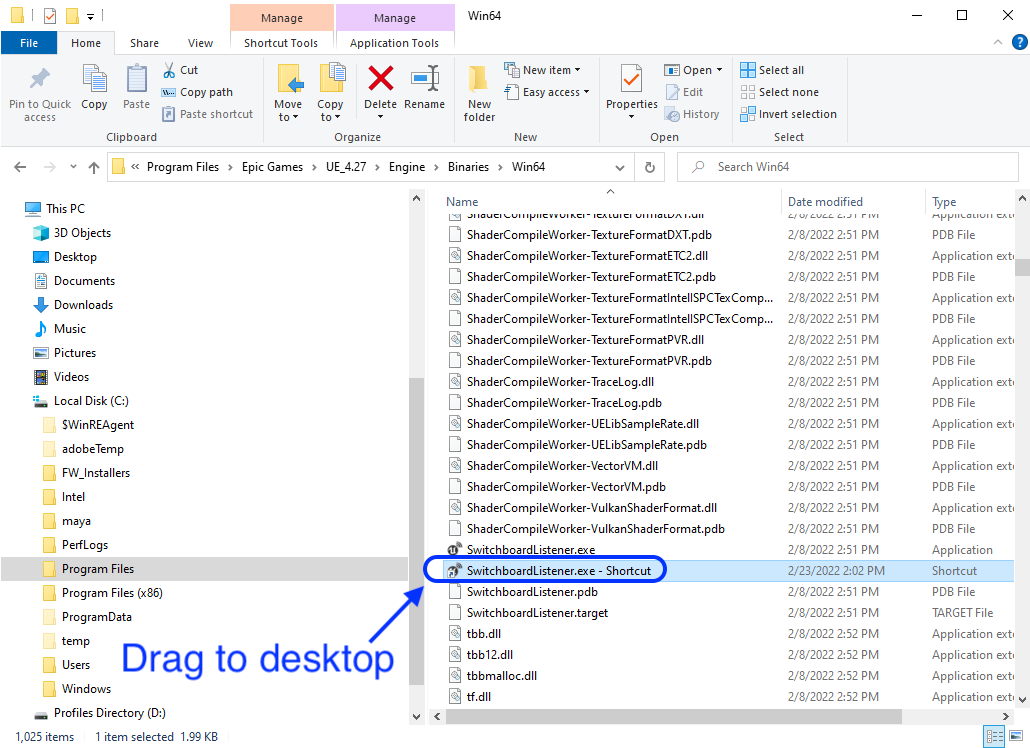
Make sure SwitchBoardListener is running. You can find it in D:\Program Files\Epic Games\UE4_5.0\Engine\Binaries\Win64\SwitchboardListener.exe. Creata a shortcut for the desktop. Run it.
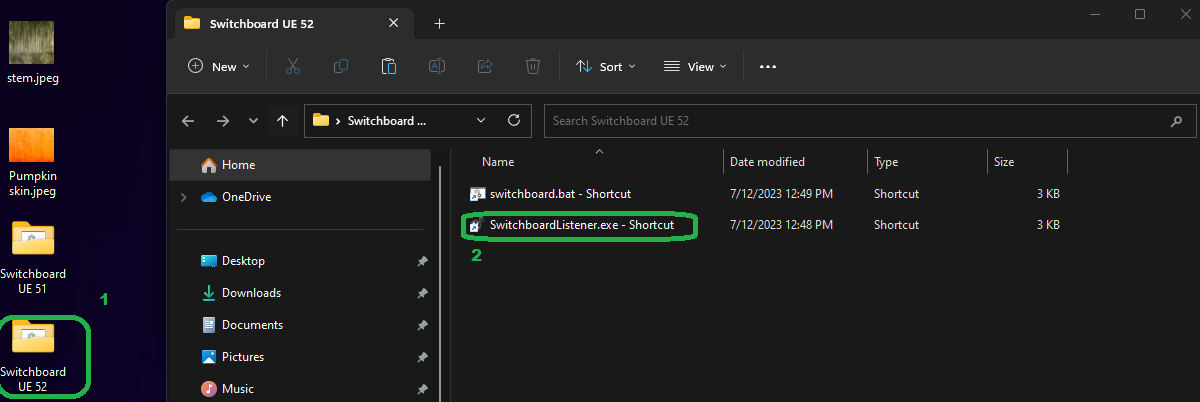
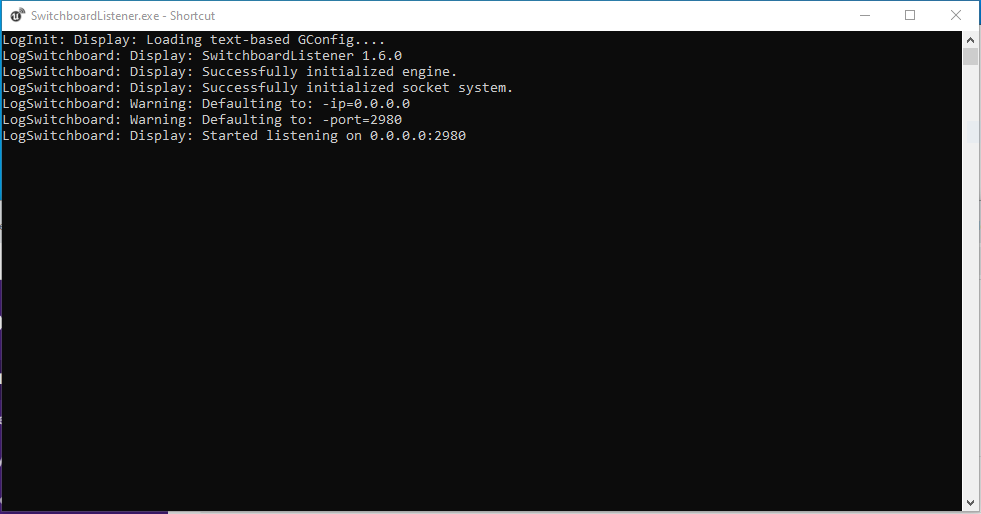
Step 6.
Double click and run the SwitchboardListener shortcut. Now you know if it working by making sure the terminal does not display any errors. This looks good.
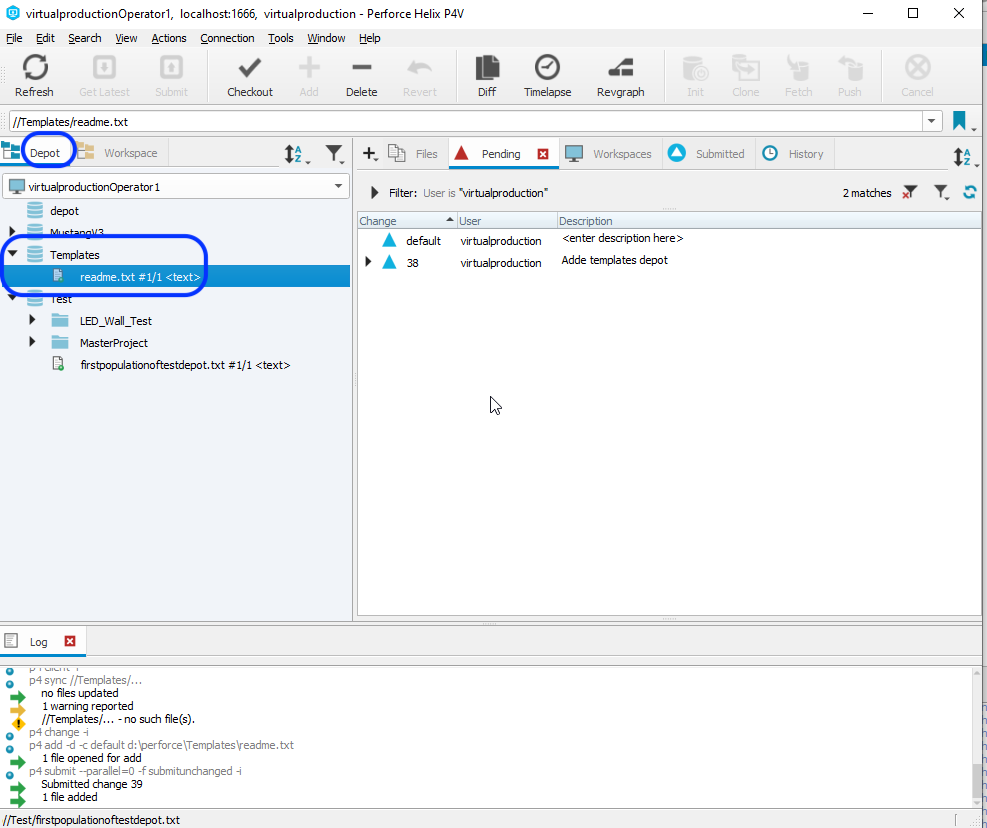
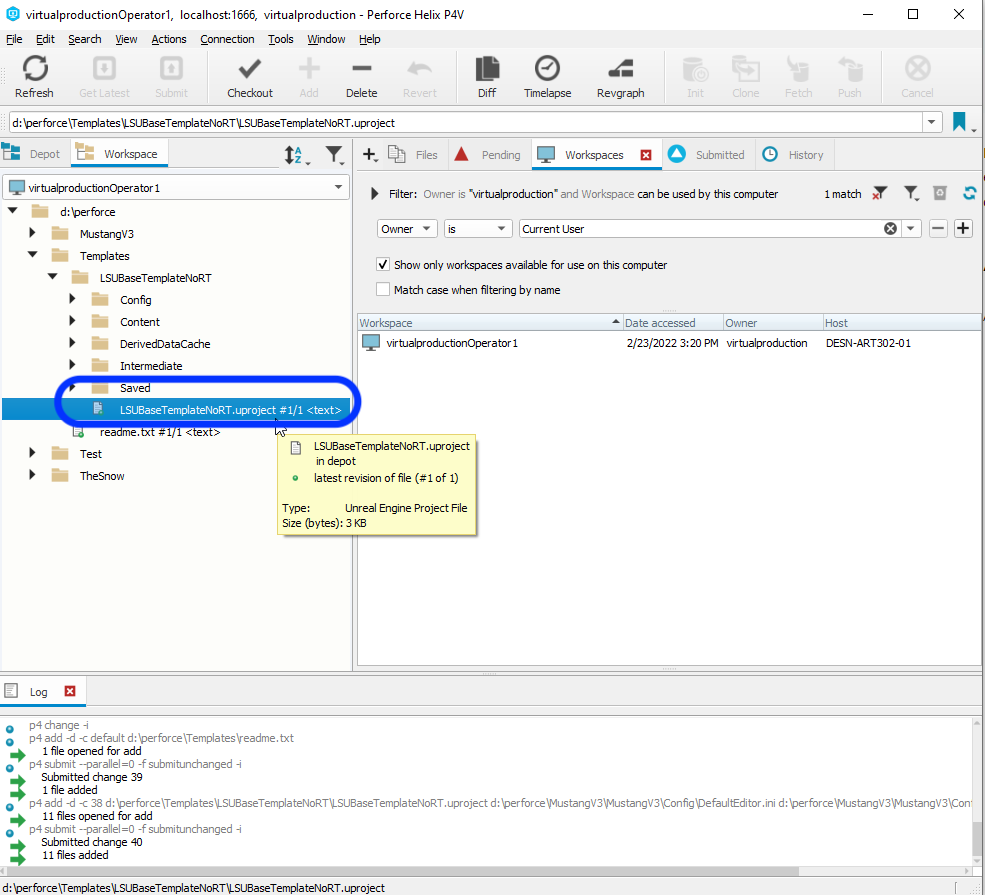
Step 7. [You should ask perforce admin for this step]
OK, we need to quit Unreal and set up a Perforce Depot (Project). Either add to an existing Depot or create a new one in the Admin interface. Use a normal Local depot. I called mine Templates with a project folder called LSUBaseTemplate.
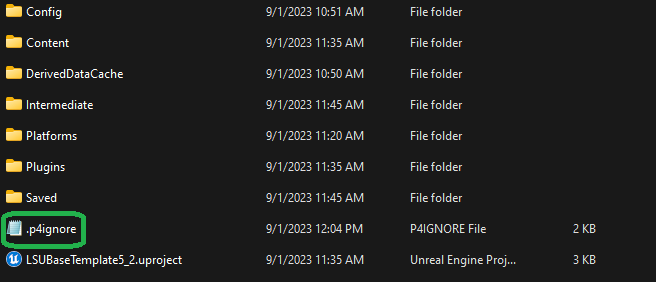
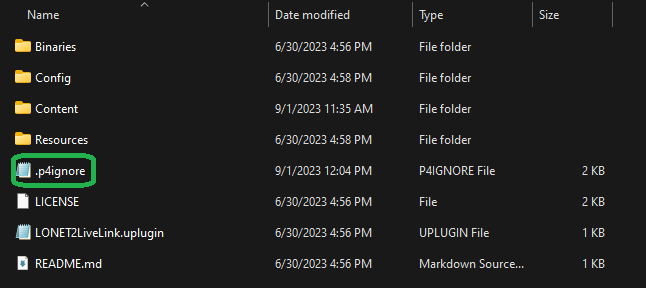
Step 8.
Now we need to add a .p4ignore file. You can download it here .p4ignore. This allows us to indicate folders and files that will not be included in the repo as they are generated sepearately at run-time on each machine. Include it in the root folder with the .uproject file and the root folder of both plugins.
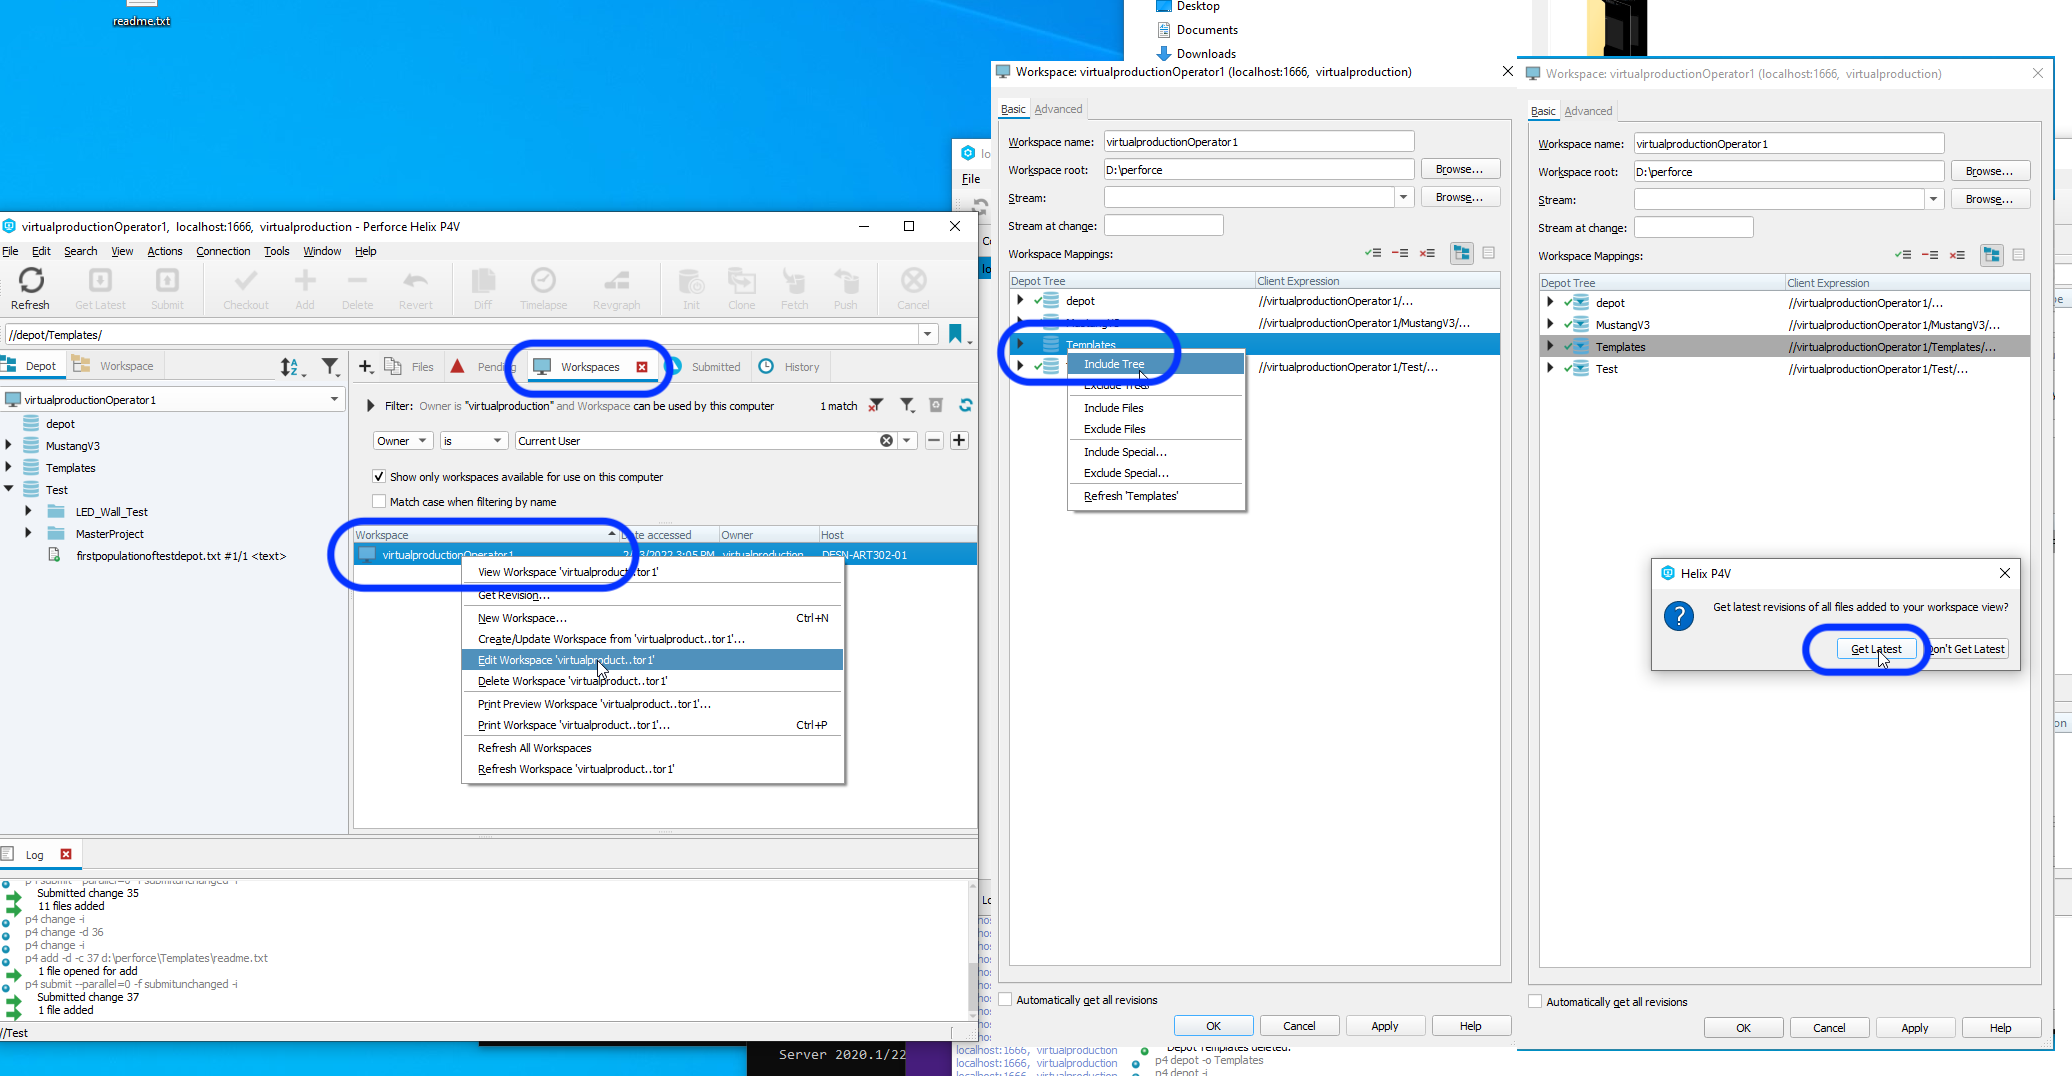
Step 9.
Now we need to add this new depot to a existing workspace. Right click on the Workspaces in P4V. Right click on the workspace and select Edit Workspace 'name of workspace'. Then a window pops up and select Include Tree. Then select Get Latest button. or you can make a new workspace and choose the depot stream that have made for your project.
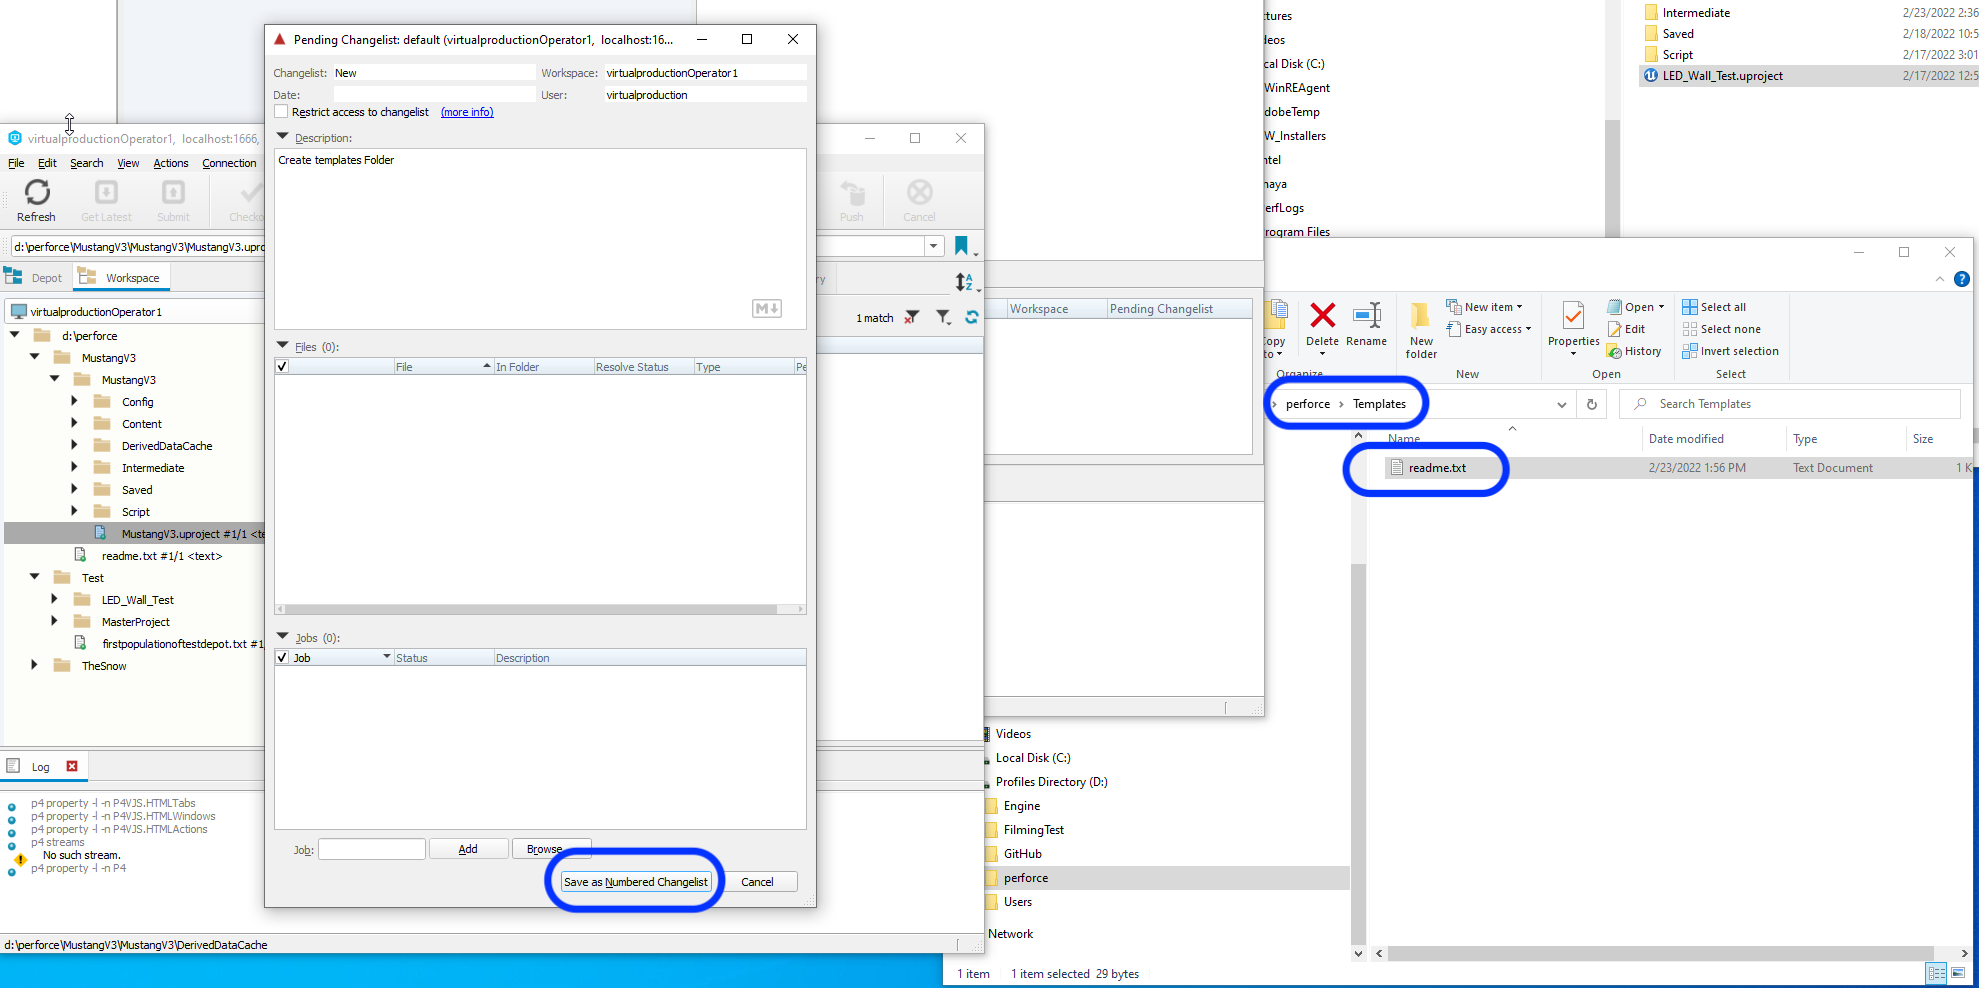
Step 10.
Select .p4ignore and press Add to add the file to the repository. Select the Pending tab and submit the Changelist. Enter a message and submit the changelist.
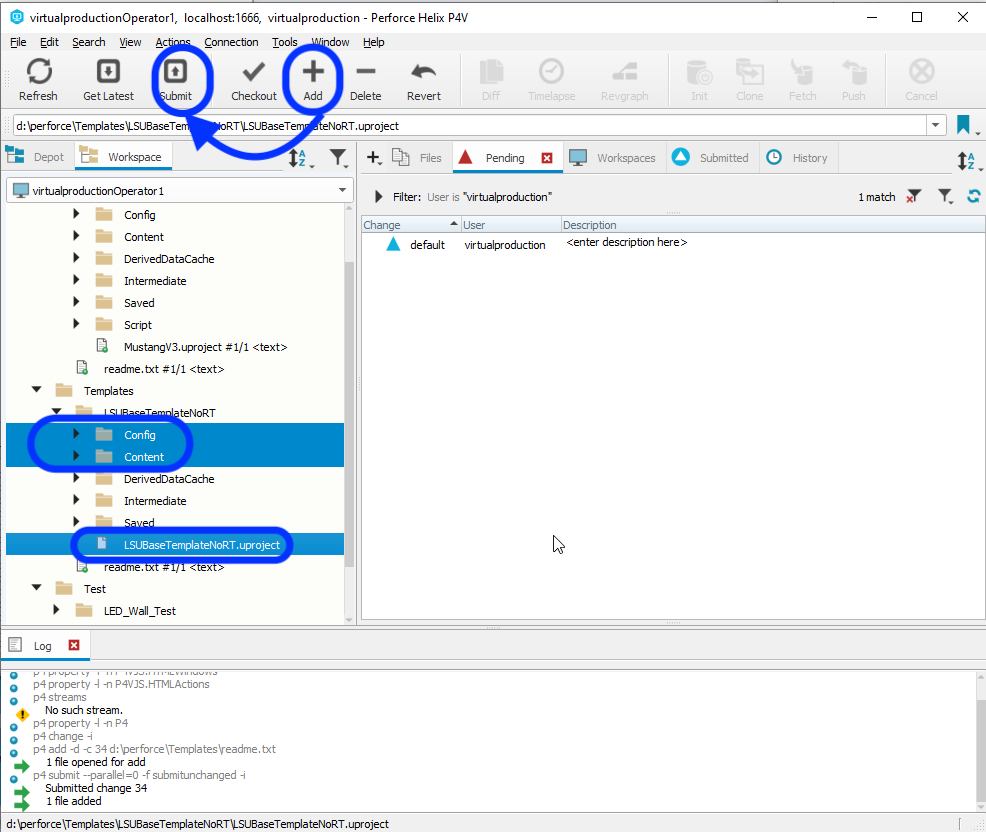
Step 11.
Click on the Templates folder and select Reconcile Offline Work.... Then Submit the changelist with a comment.
Step 12.
Now launch the game from P4V by double clicking an launching Unreal from the interface and not from the explorer or through Epics tools.
Step 13.
If all works well the source control will default to being connected. You can also activate Source Control in the Content Browser. To do so, right-click any asset or folder. At the bottom of the context menu, in the Source Control section, click Connect to Source Control.
Connect to Source Control

This will open a log-in screen where you can select your source-control system and enter any appropriate settings and other information.
Source Control Login
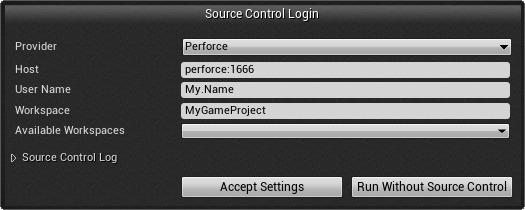
Enter the appropriate information, and click Accept Settings. After source control is activated, the display of the assets in the Content Browser will change to reflect their source-control status, and some source-control options will be included on the right-click context menu.
Step 14.
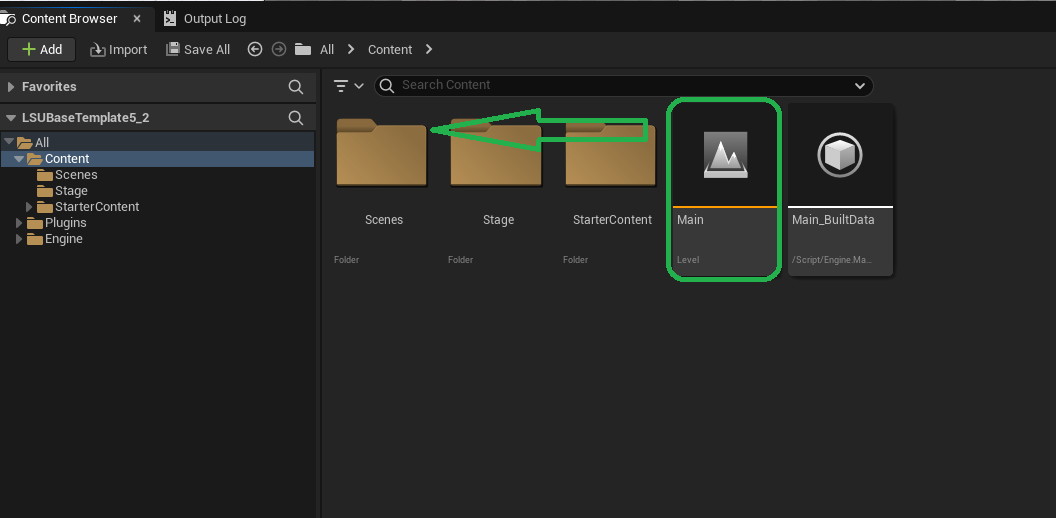
Now you will create two folders Stage and Scenes. The stage folder will have all the elements we need for our XR stage. The scenes folder will contain all the scenes we are going to use in this project. Go back to the top Content folder and drag Main into the Scenes folder. You will get a warning about moving this level (but since we have done nothing to it it is OK to ignore), press the Yes button.
Step 15.
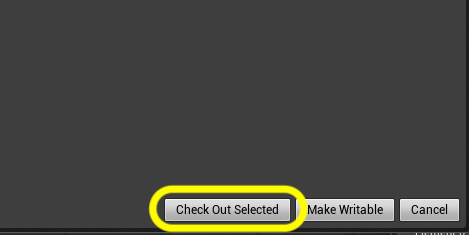
Now when you go to save, if you have not checked out the file you will be prompted to Check out Selected. NEVER select Make Writable. This should never be used. The only reason a file can't be checked out is if someone else is using it. Just ask that person to check it back in so you can access it. In this case select Check Out Selected (any time you try and save an existing non-checked out asset).
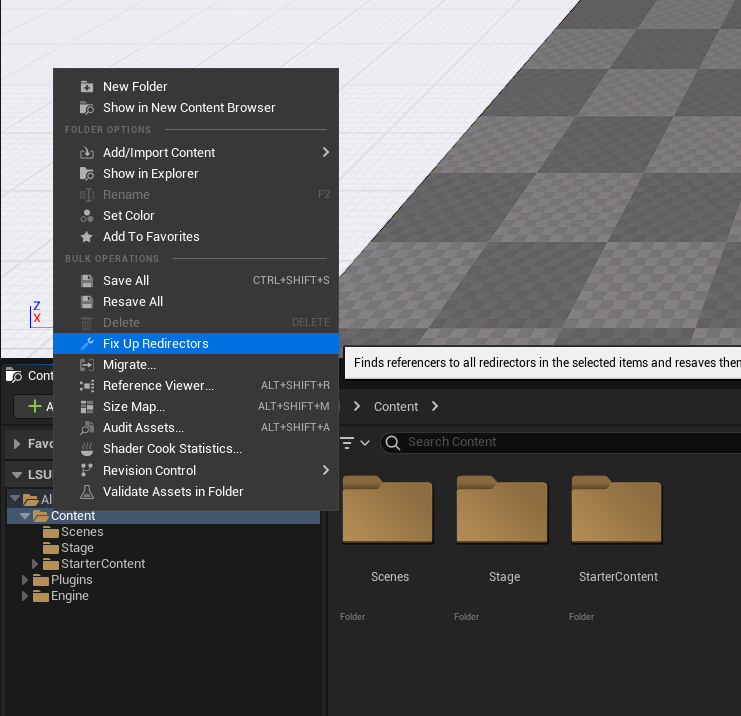
Step 16.
Right-click on the Content folder and select Fix Up Redirectors in Folder.
Step 17.
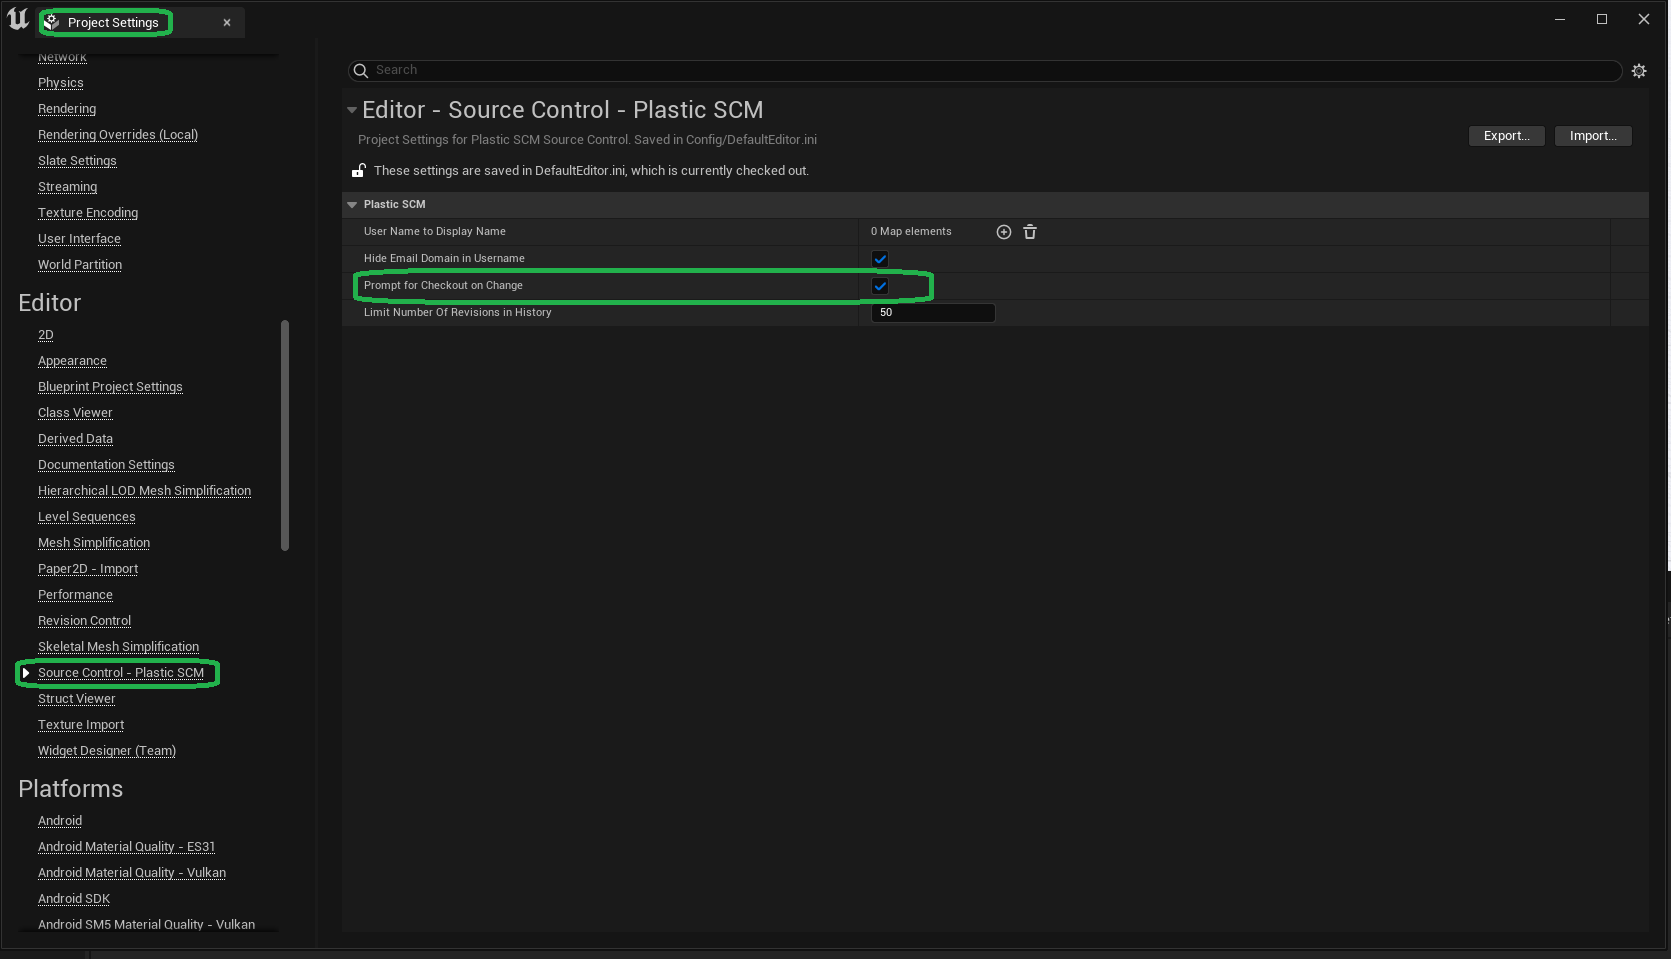
Now we want to the source control to check out files as they are being edited. So this way you don't have surprises after an hour or so working on a level that it is locked and can't be saved.
Go to Edit | Project Settings and go to the Editor tab, go to the Source control and checked Prompt for checkout on change.