nDisplay Config
The heart of how the multi view system works in Unreal is through a plugin called nDisplay.
Step 1.|BTS|
First we need a 3-D representation of our wall in exact dimesions. Download the static mesh LSU_LED_Wall.FBX.


Step 2.|BTS|
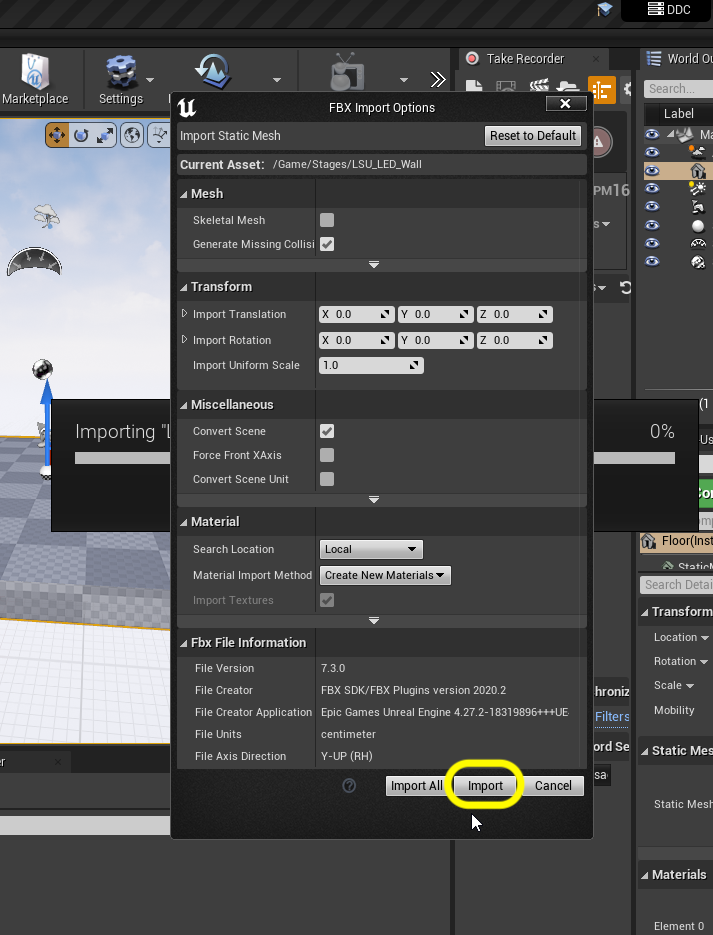
Drag the fbx you downloaded above into Unreal and accept the default settings for importing FBXs.
Step 3.|BTS|
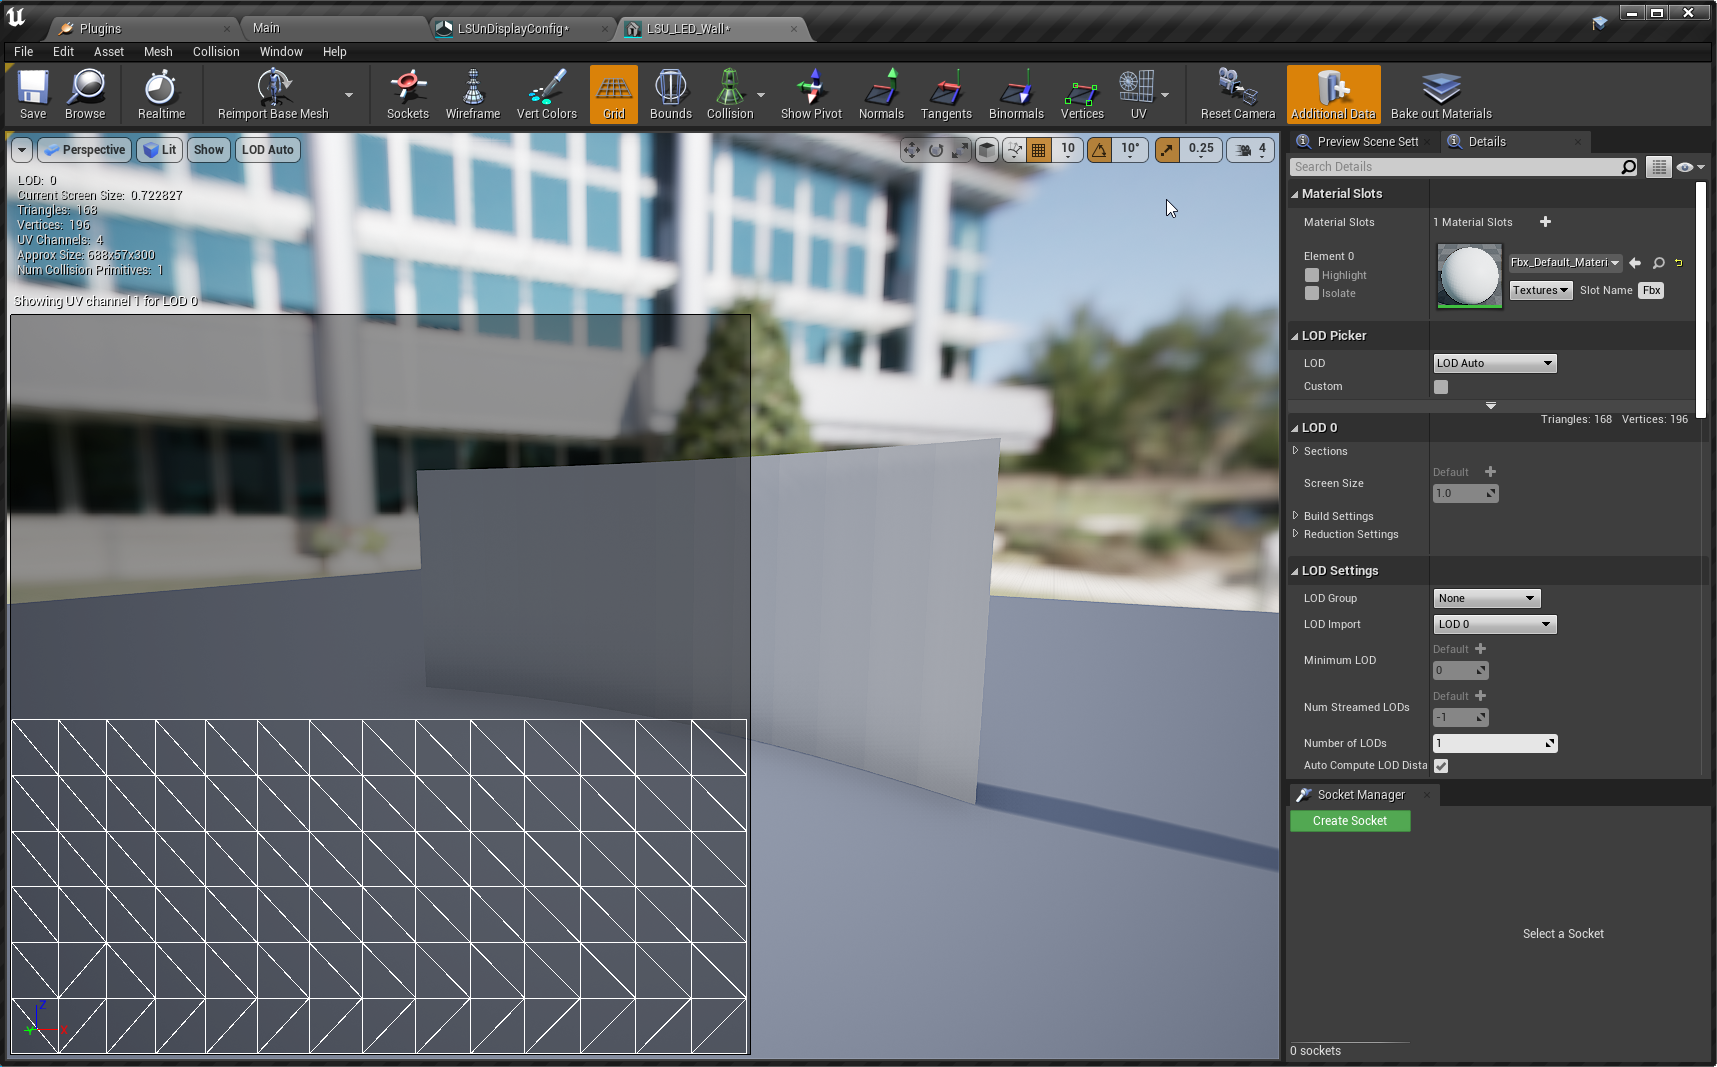
Open up the static mesh and it is an exact replica of our screen. It contains two sets of UV's. UV0 is just a 0 to 1 UV with the entire area filed. The UV1 has our 6 x 14 grid of screens with the exact ratio of the wall.

Step 4.|BTS|
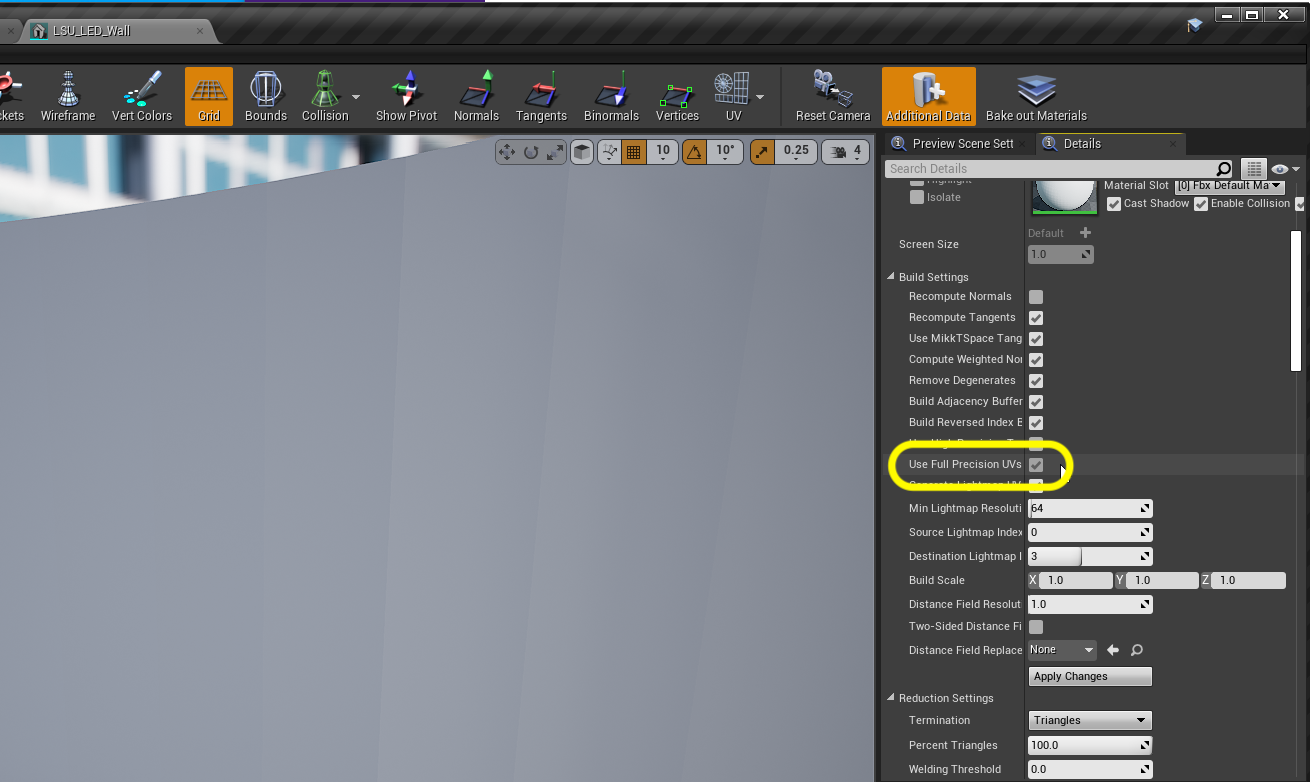
The only change we need to make to this static mesh is to set Use Full Precision UVs to true. This uses greater floating point accuracy when calculating the UV's (I believe).
Step 5.|BTS| 
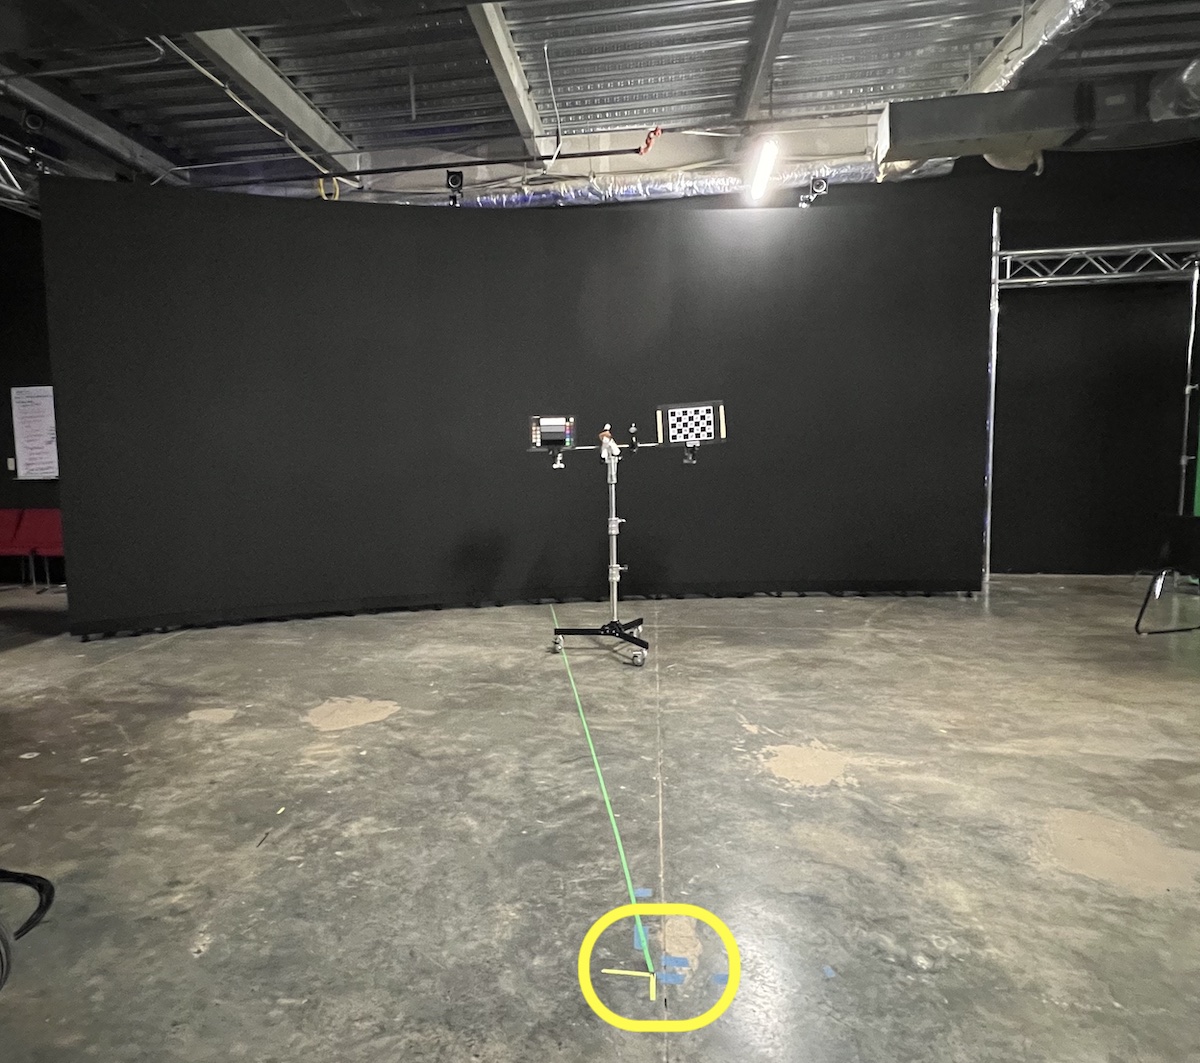
Now the only other special thing is that we have calibrated world 0,0 in our space about 10 feet in front of the center of our screen. That is where we calibrate all of our 3-D systems.

Step 6.|BTS|
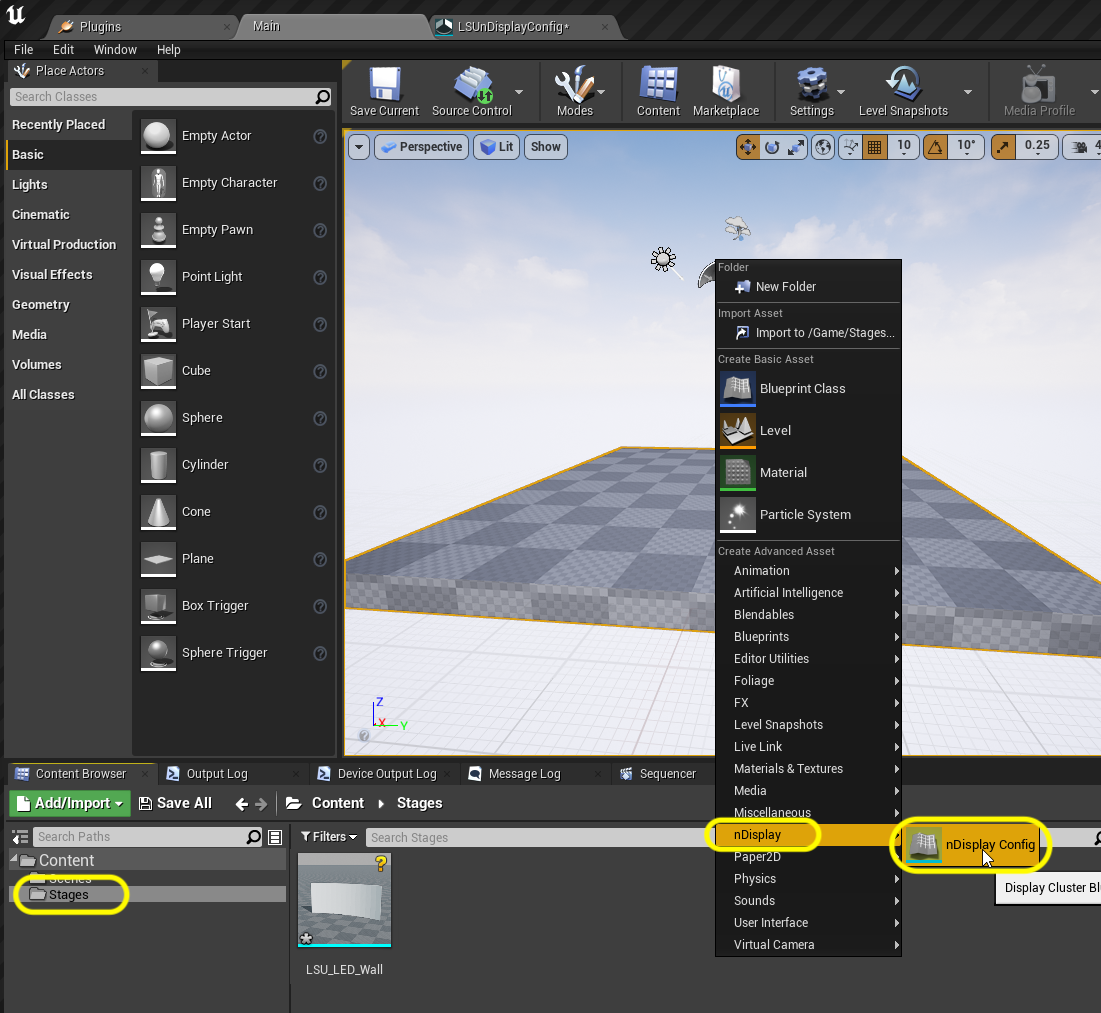
Select the Stages folder. Press the green Add/Import button and add a nDisplay | nDisplay Config file to the folder. Call this file LSUnDisplayConfig.
Step 7.|BTS|
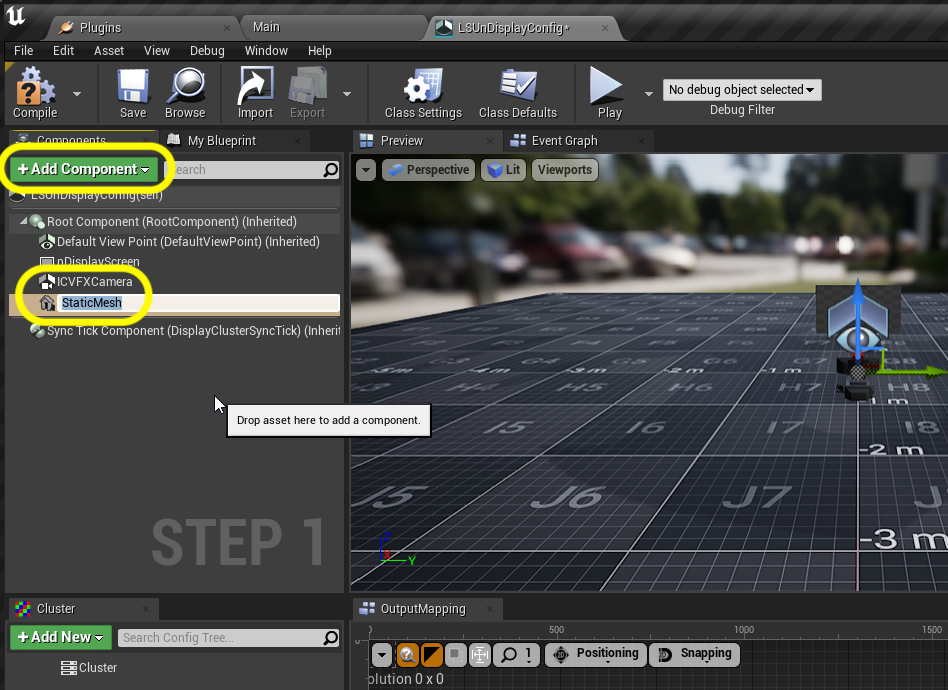
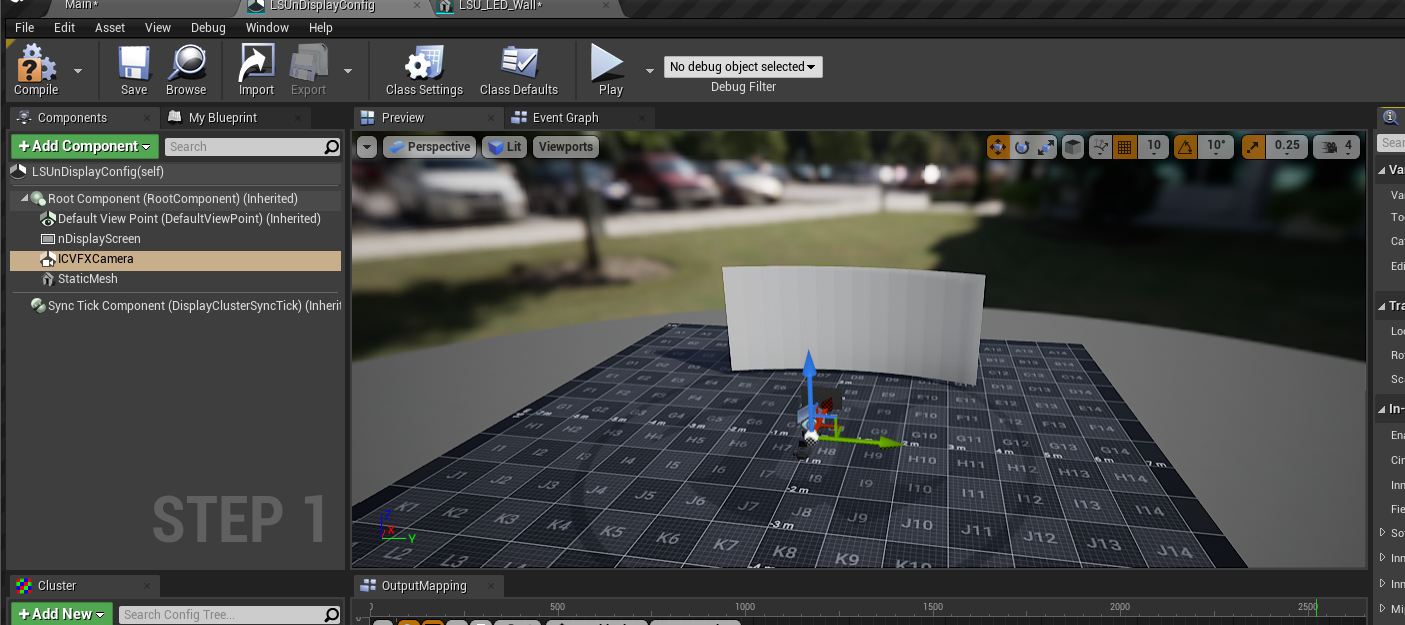
Open up the LSUnDisplayConfig file. Press the green Add Component button and add an ICVFX Camera and a Static Mesh.
Step 8.|BTS|
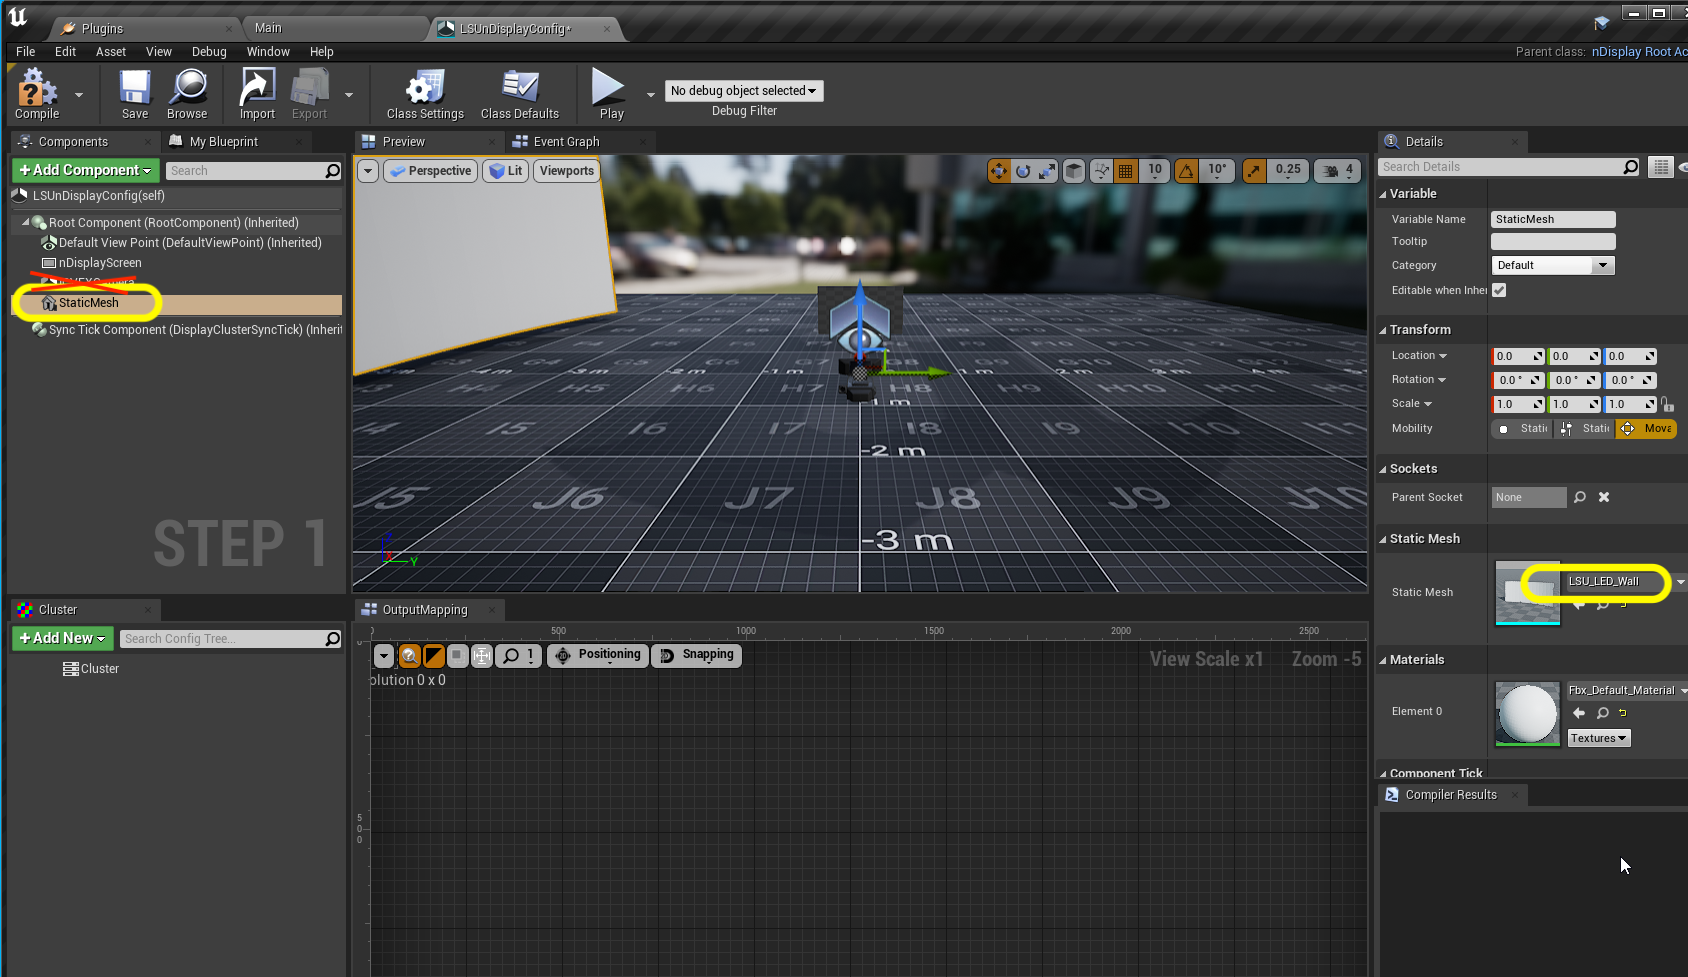
Click on the StaticMesh component and add the LSU_LED_Wall to the mesh in the Details panel. Erase unused nDisplaySystem component.
Step 9.|BTS|
Rotate the mesh so it is in the front of the stage. The letters should be right side up if we are looking at the screen.
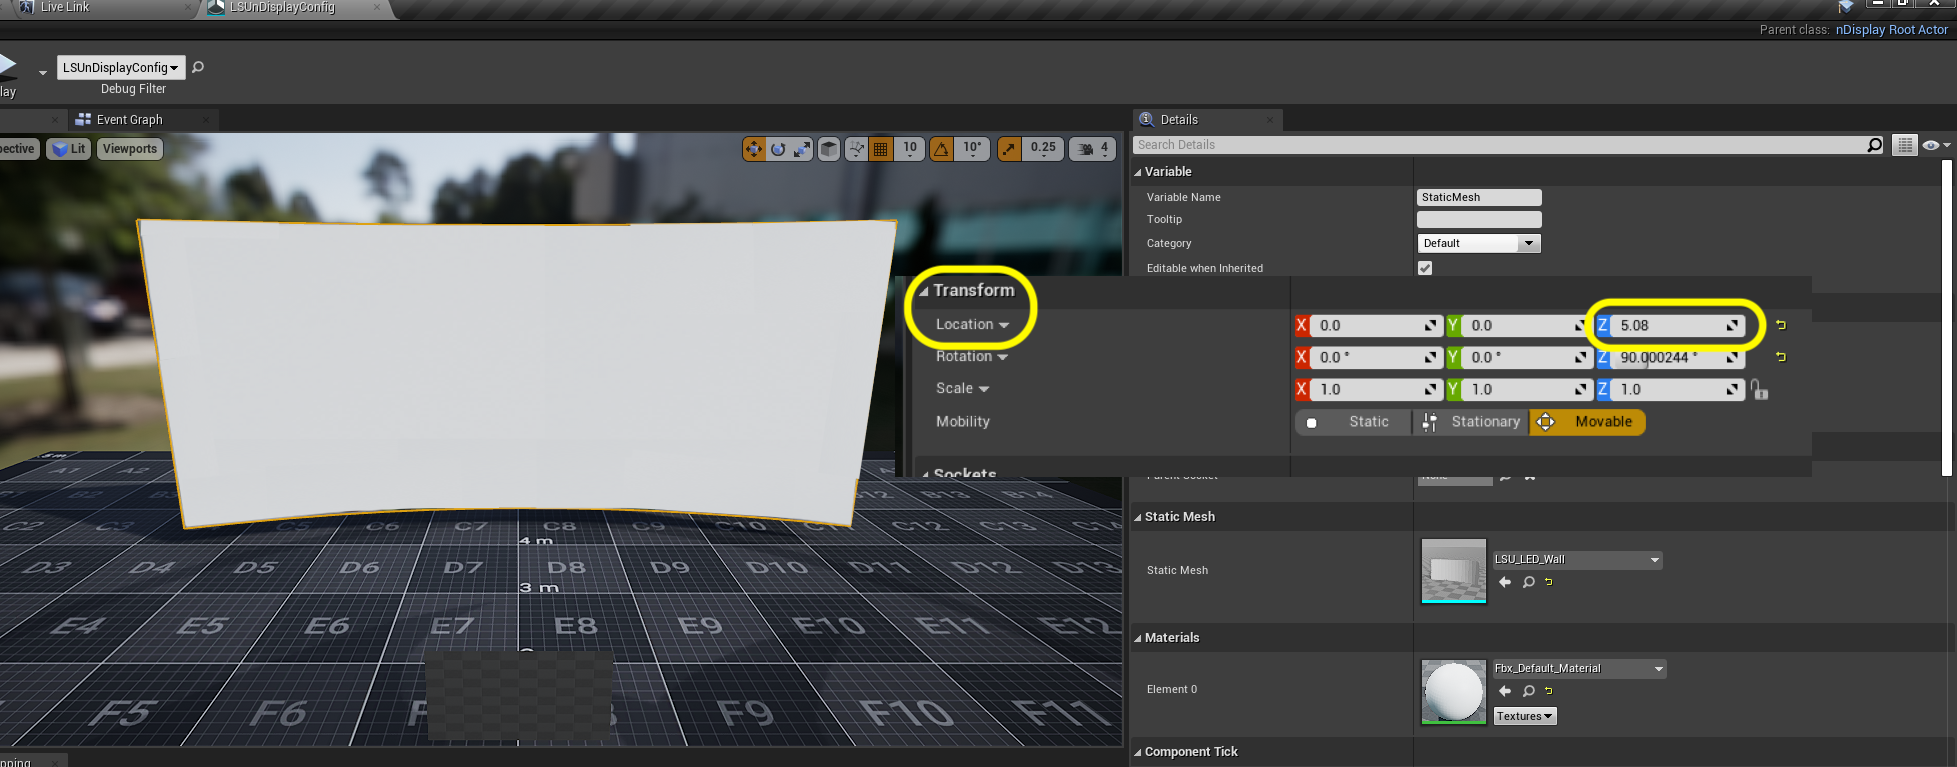
Step 10.|BTS| 
Now zero out the Transform on the static mesh for the screen and the screen does not start on the floor. It is 5.08 cm off of the floor. We need to adjust the Z (+Z is facing up) by 5.08 units (1 unit is 1 cm in Unreal by default).
Step 11.|BTS|
Since our resolution is less than a 4K screen we can use a single cluster node to power the screen. Right click on Cluster and select Add New Cluster Node.
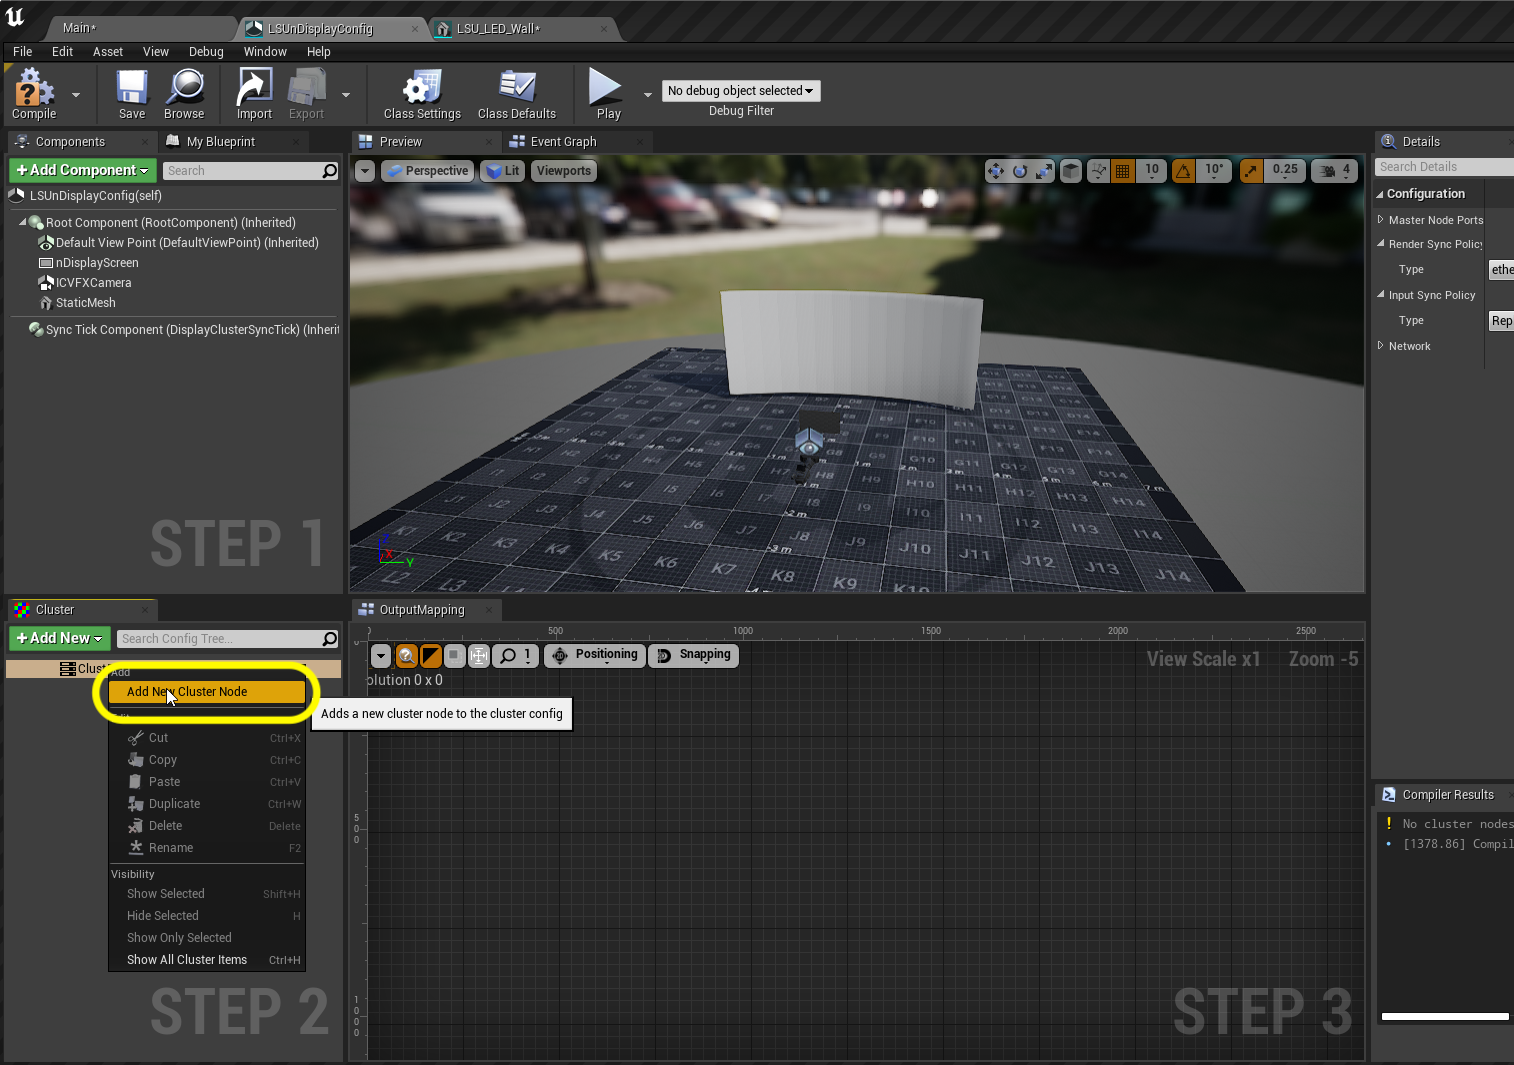
Step 12.|BTS|
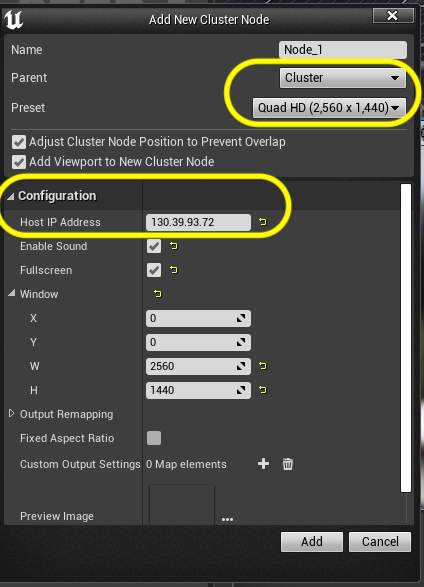
You can leave the the node named Node_0). Make sure the Parent is set Cluster. Choose the QHD (2,560 x 1,440) Preset. That is the size of the entire frame going from Unreal to the Brompton. The game only uses a part of it as the screens don't have this many pixels. The ROE panels are pixels 176 pixels square per panel. We have a grid of 14 tiles wide by 6 tiles tall, thus giving us a resolution of 2464 x 1056, which nestles into the QHD preset. The IP of our main machine is 130.39.93.72. Enable Sound and enable Full Screen. Press the Add key.
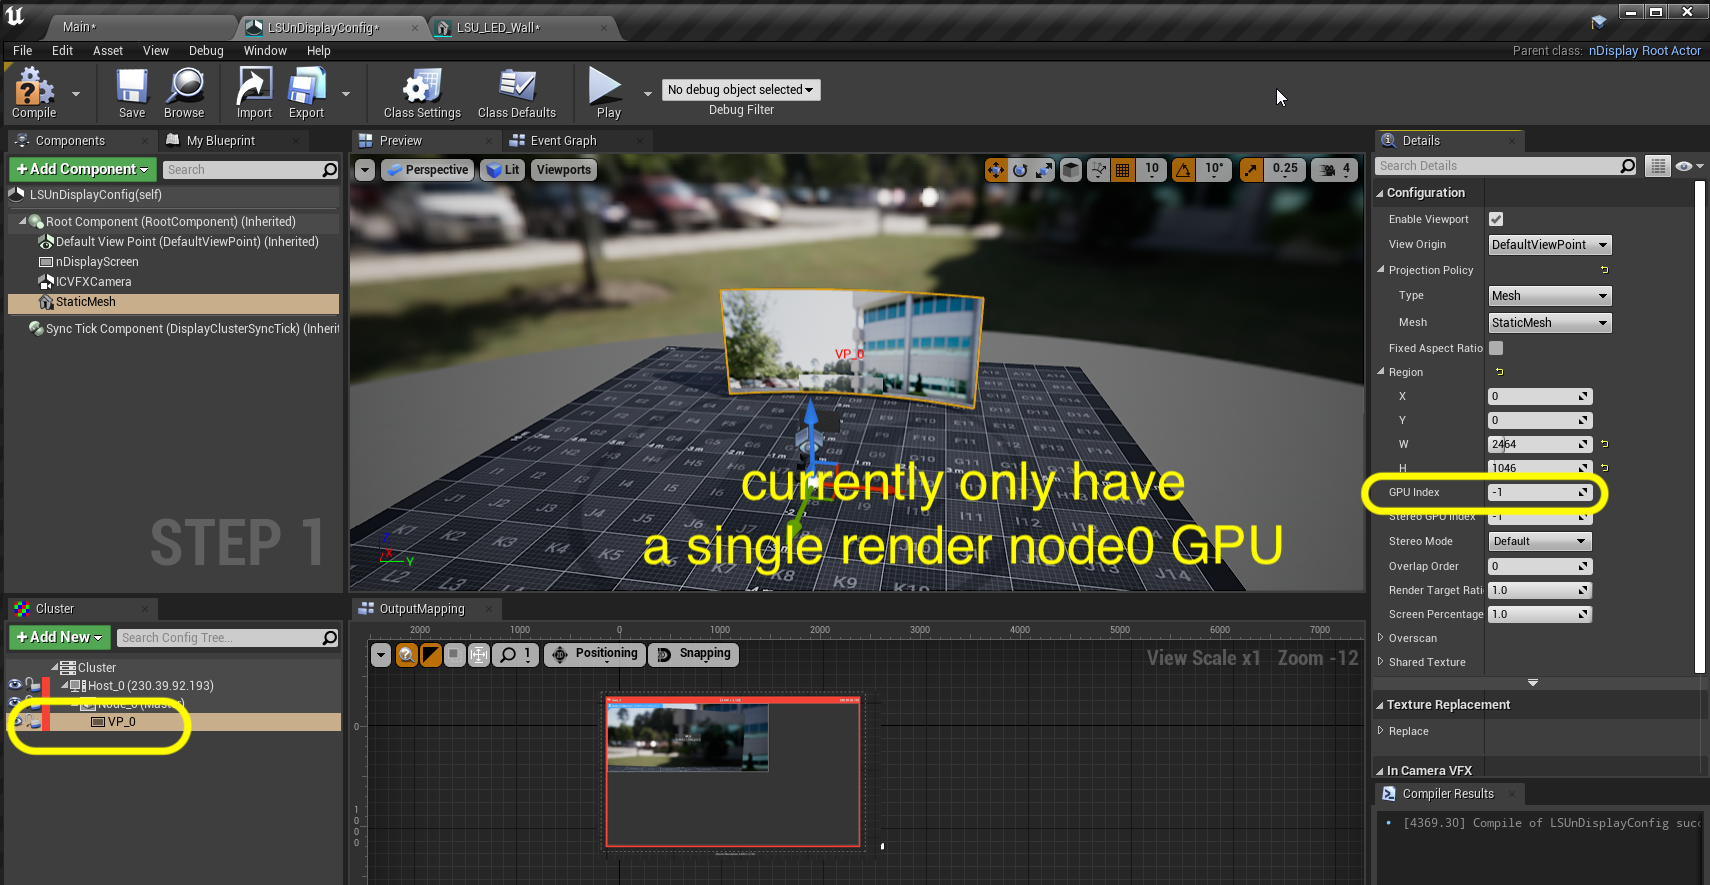
Step 13.|BTS|
Select the viewport, likely called VP_0, under the Cluster panel. In the Details panel change View Origin to DefaultViewPoint. Also, change Projection Policy > Type: Mesh and Projection Policy > Mesh: LSU_LED_Wall.
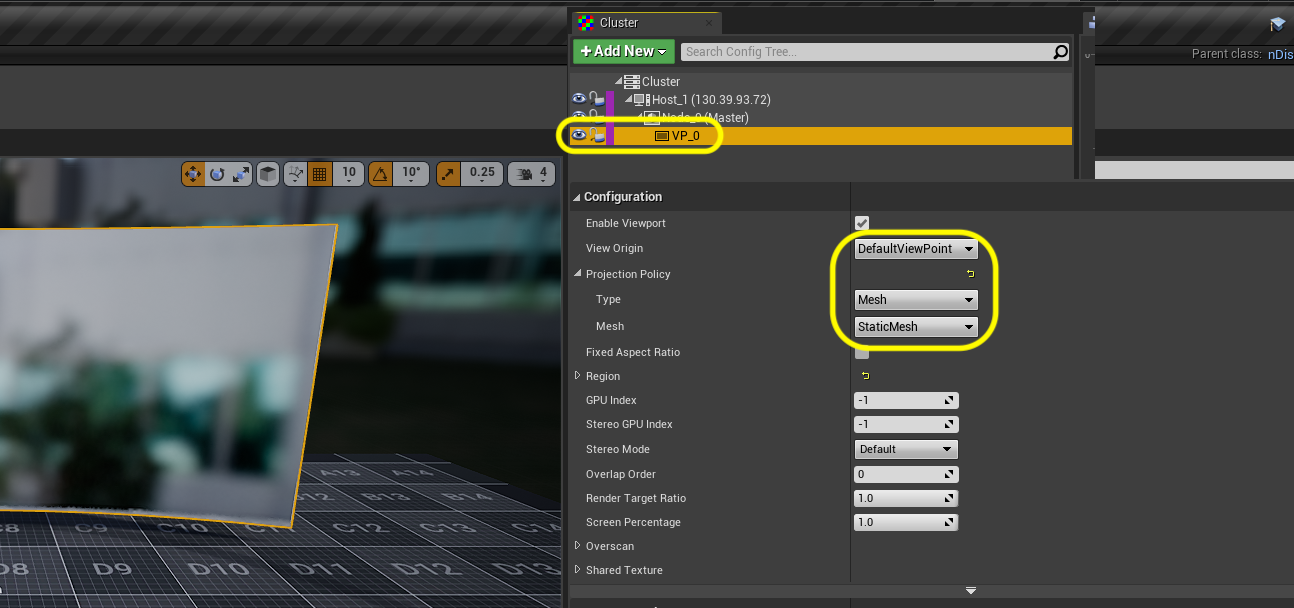
Step 14.|BTS|
Now you can move the ICVFX camera around and the frustum should move as well. We have a single GPU so we leave the GPU Index at -1 (which means a single GPU).
Step 15.|BTS|
Add CineCamera actor to our Main level. Also add one copy of the LSUnDisplayConfig to the level as well. Make sure the Z is at 0 as we don't want to alter the ground position. The setup can be moved to wherever in a future level you want to place it. But we want the Actor ground level to be 0, which is what we calibrated our camera to be starting at on Z.
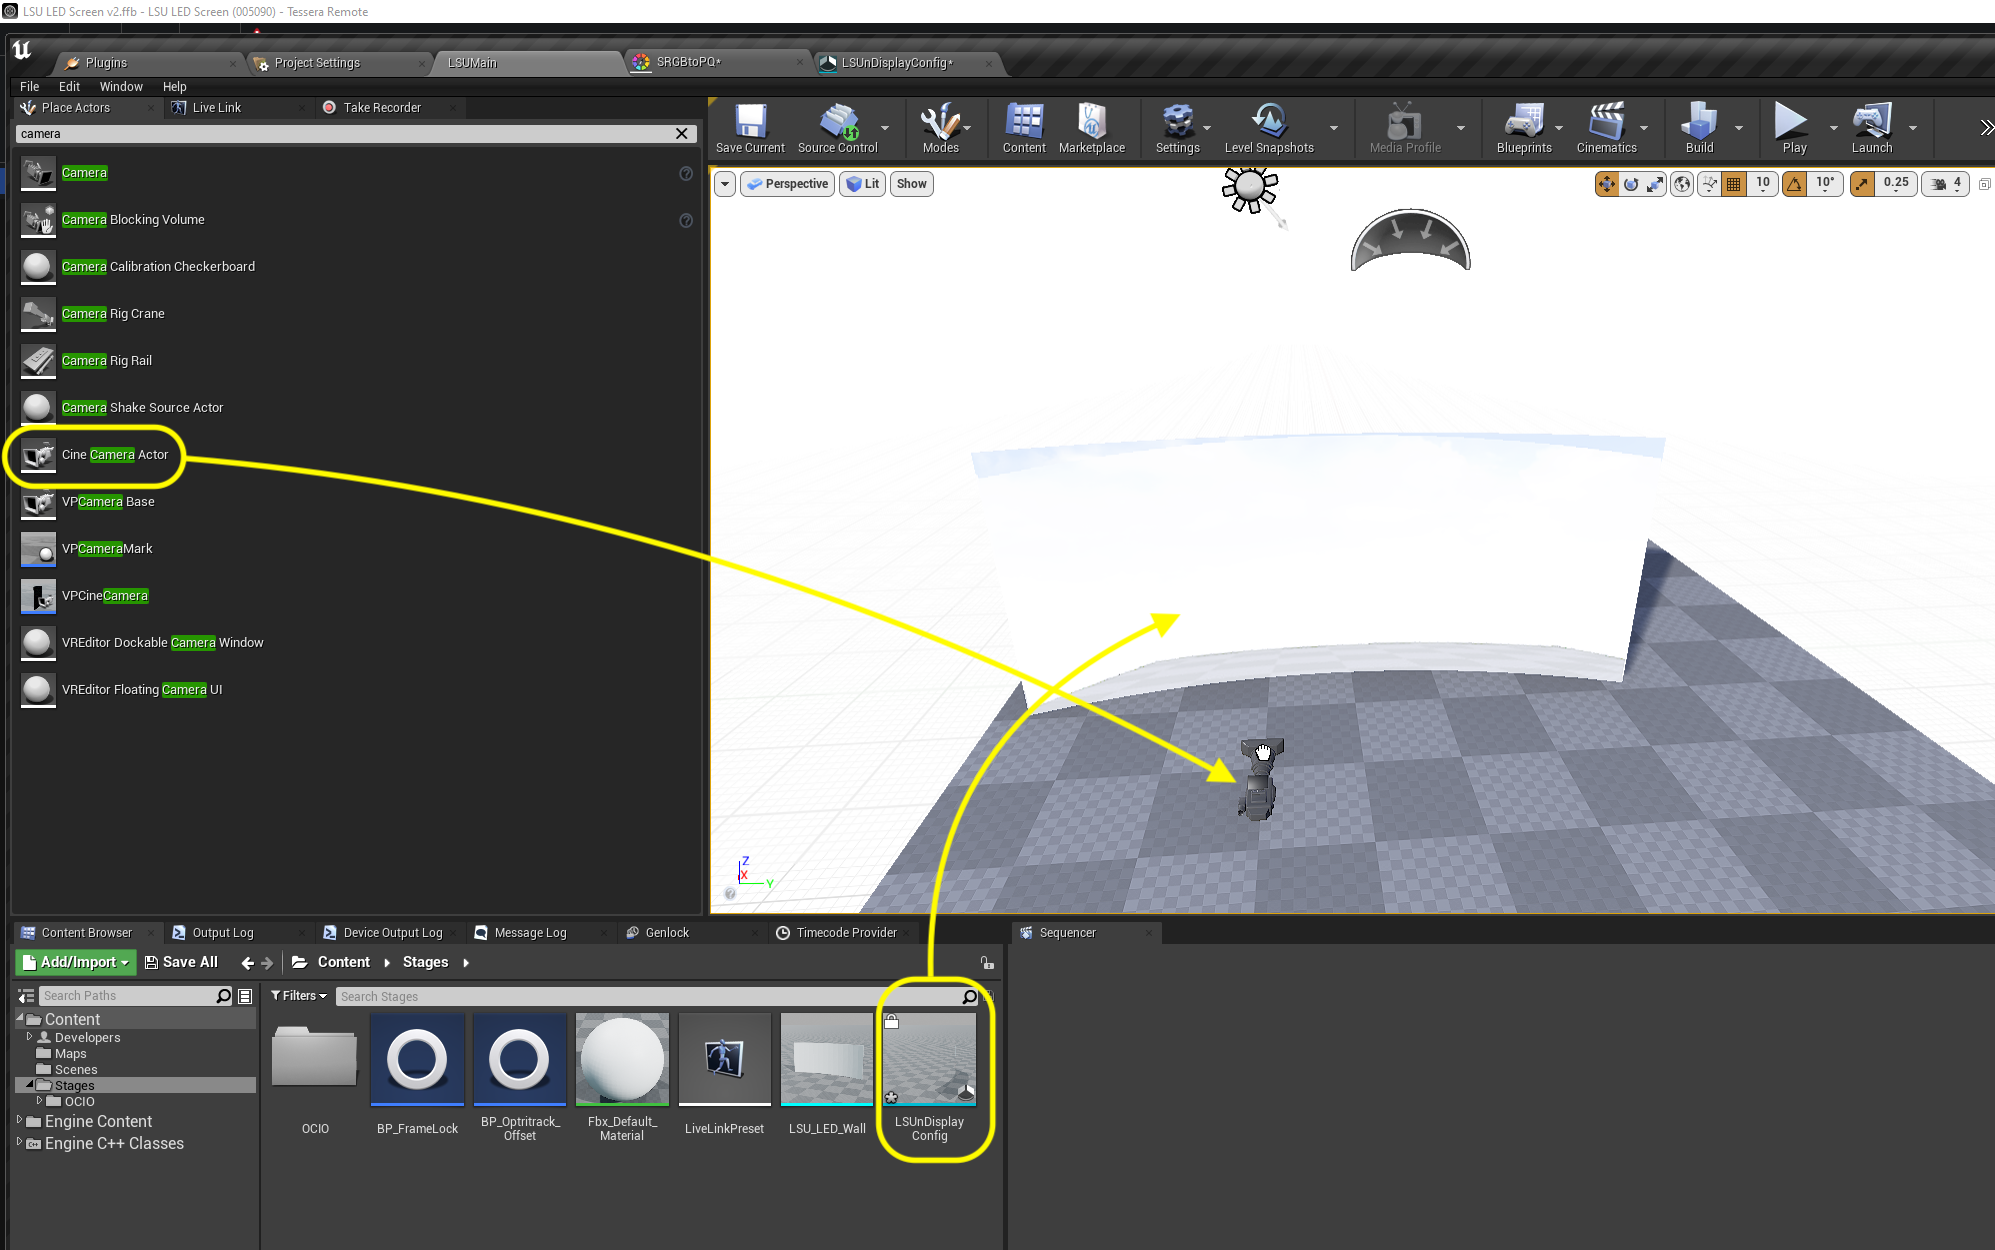
Step 16.|BTS|
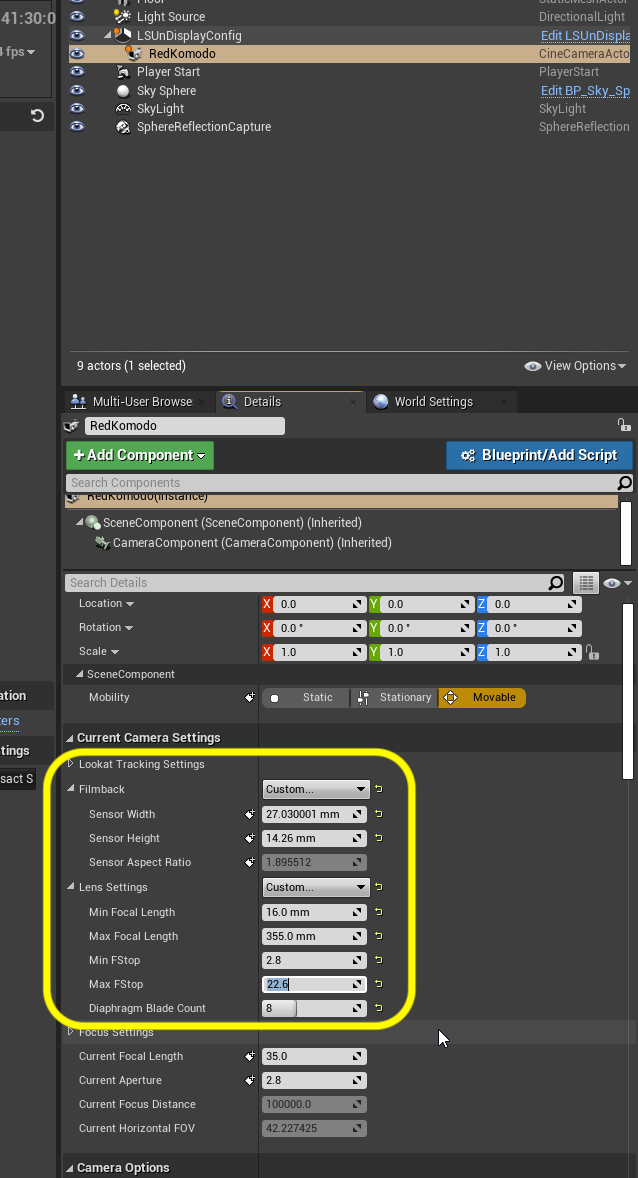
Place the CineCamera actor in the World Outliner to be a child of LSUnDisplayConfig. This way when we move the entire panel the cine camera moves with it. Make sure the CineCamera is at 0,0,0 so we do not offset it. The position will be given to the camera by the OptiTrack system. Name the camera Red Komodo.
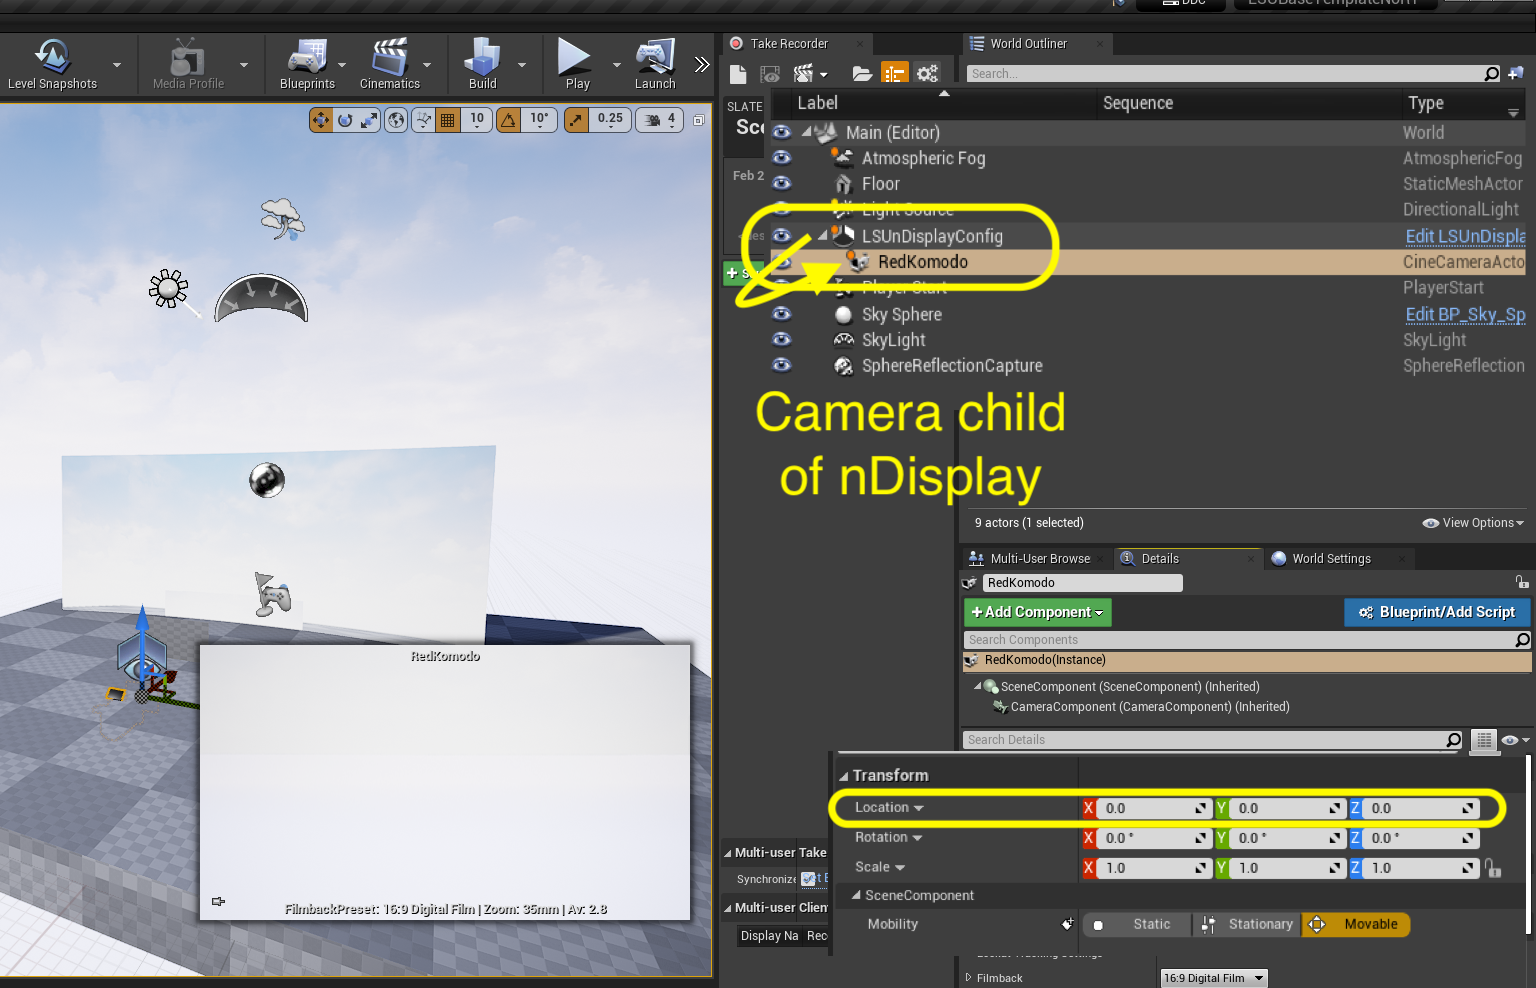
Step 17.|BTS|
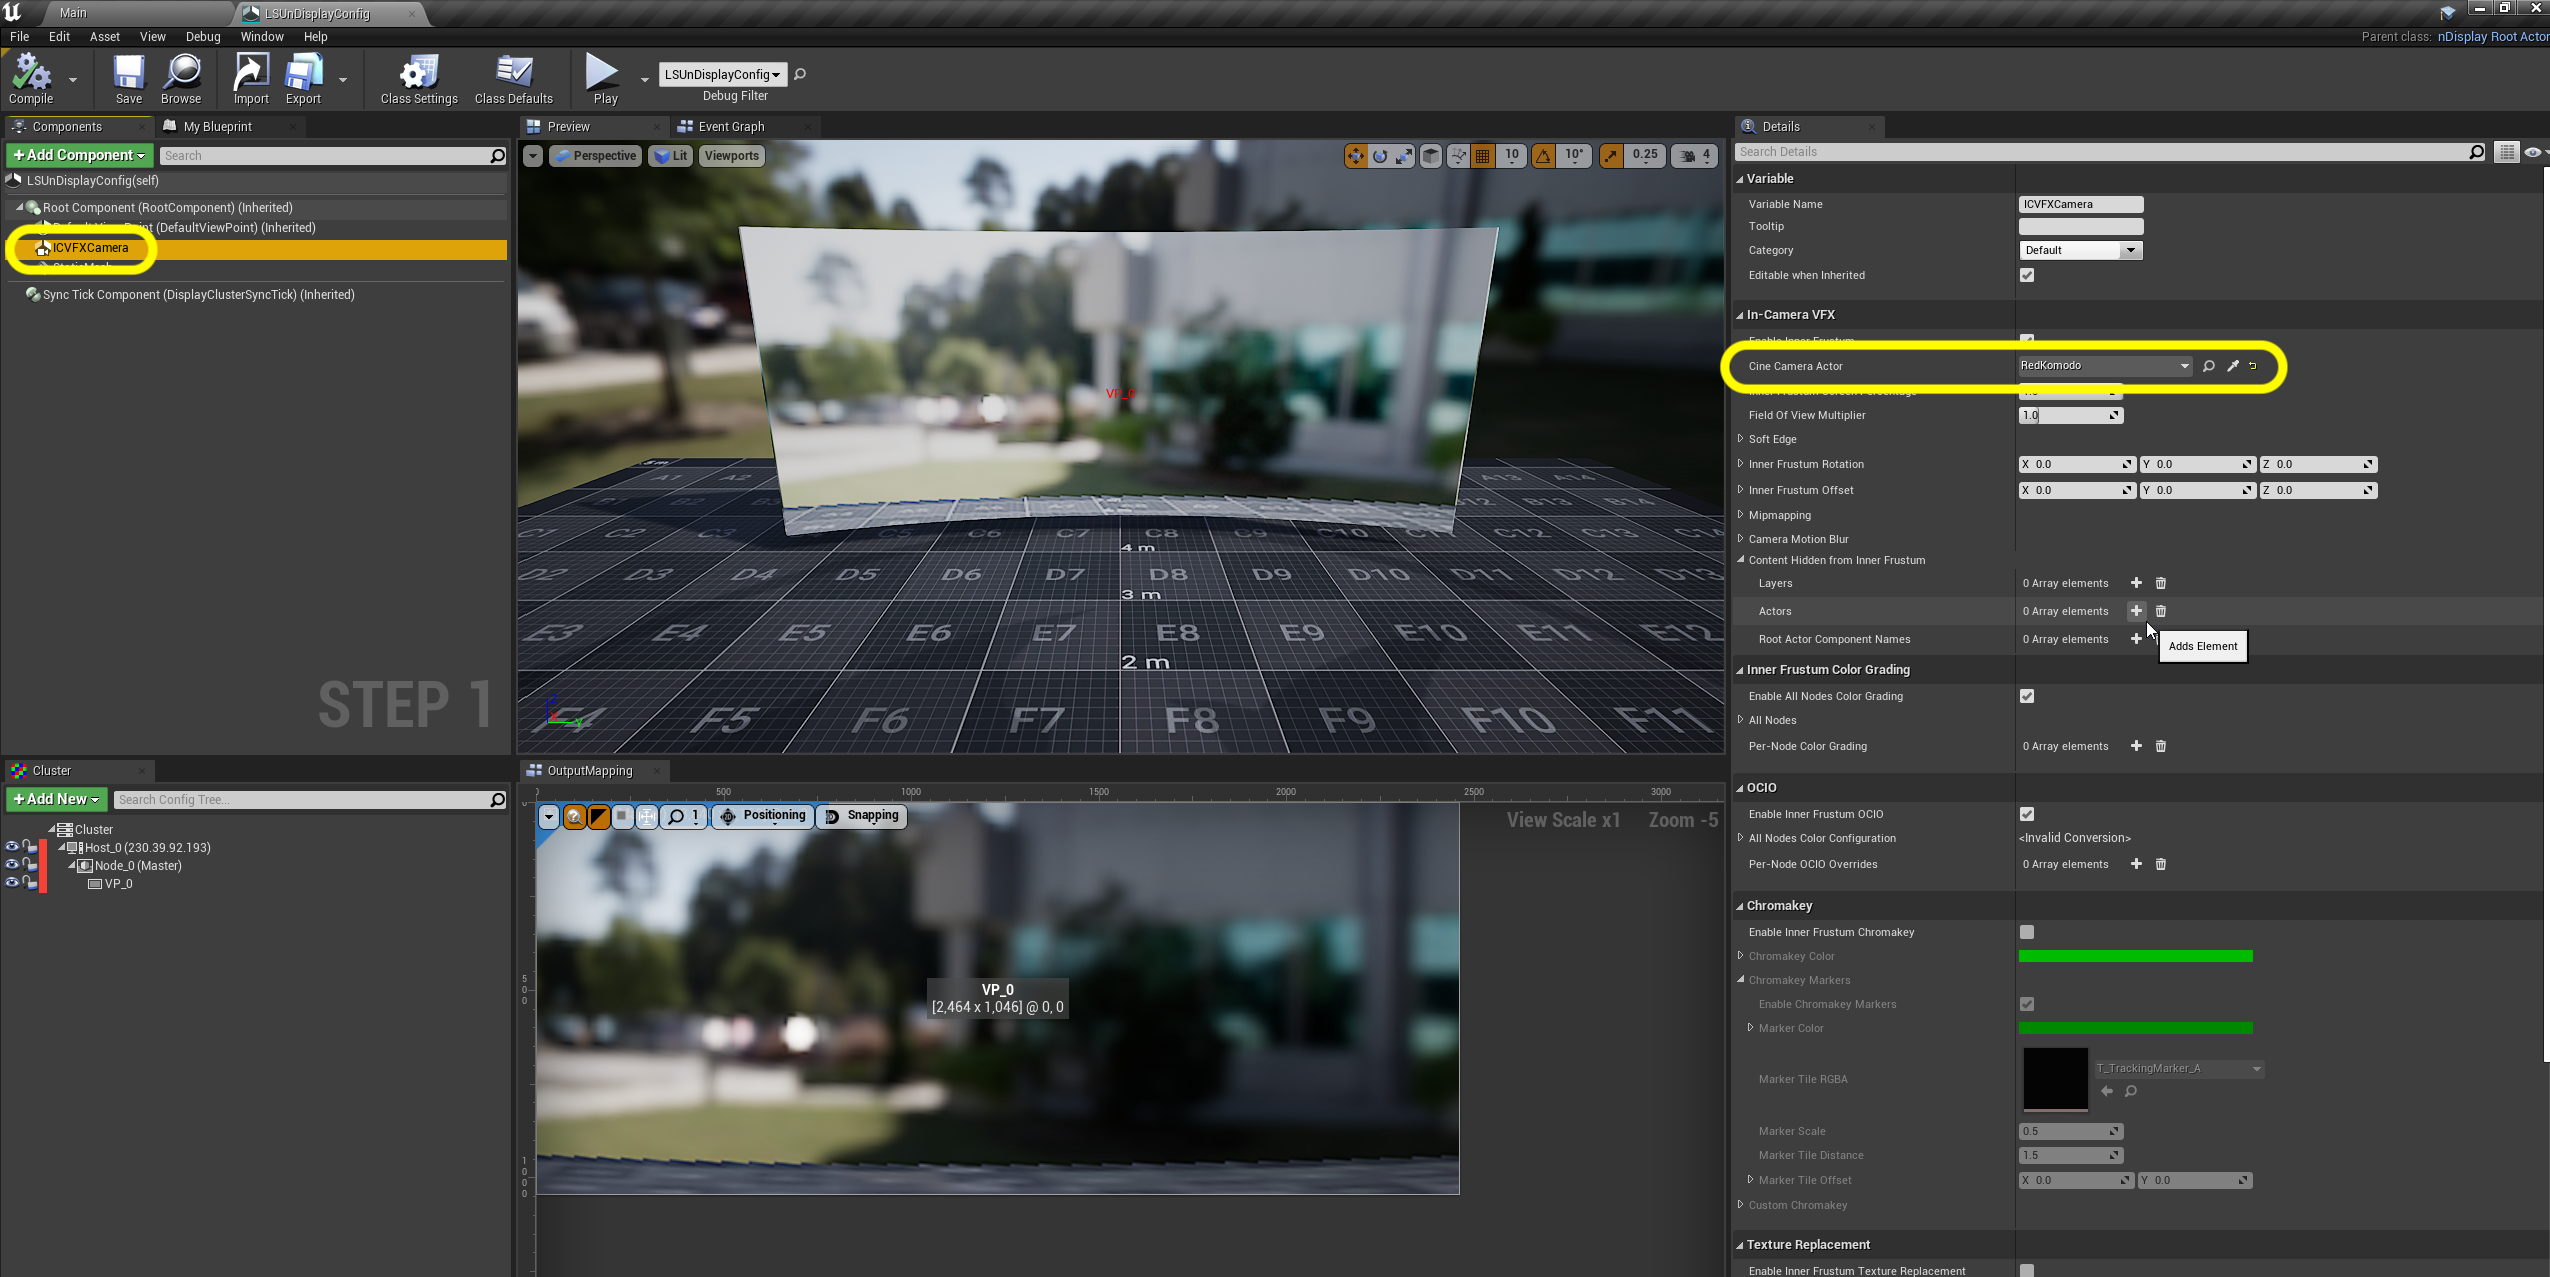
Go to the LSUnDisplayConfig and click on the ICVX Camera component and set the reference to the above Red Komodo camera.
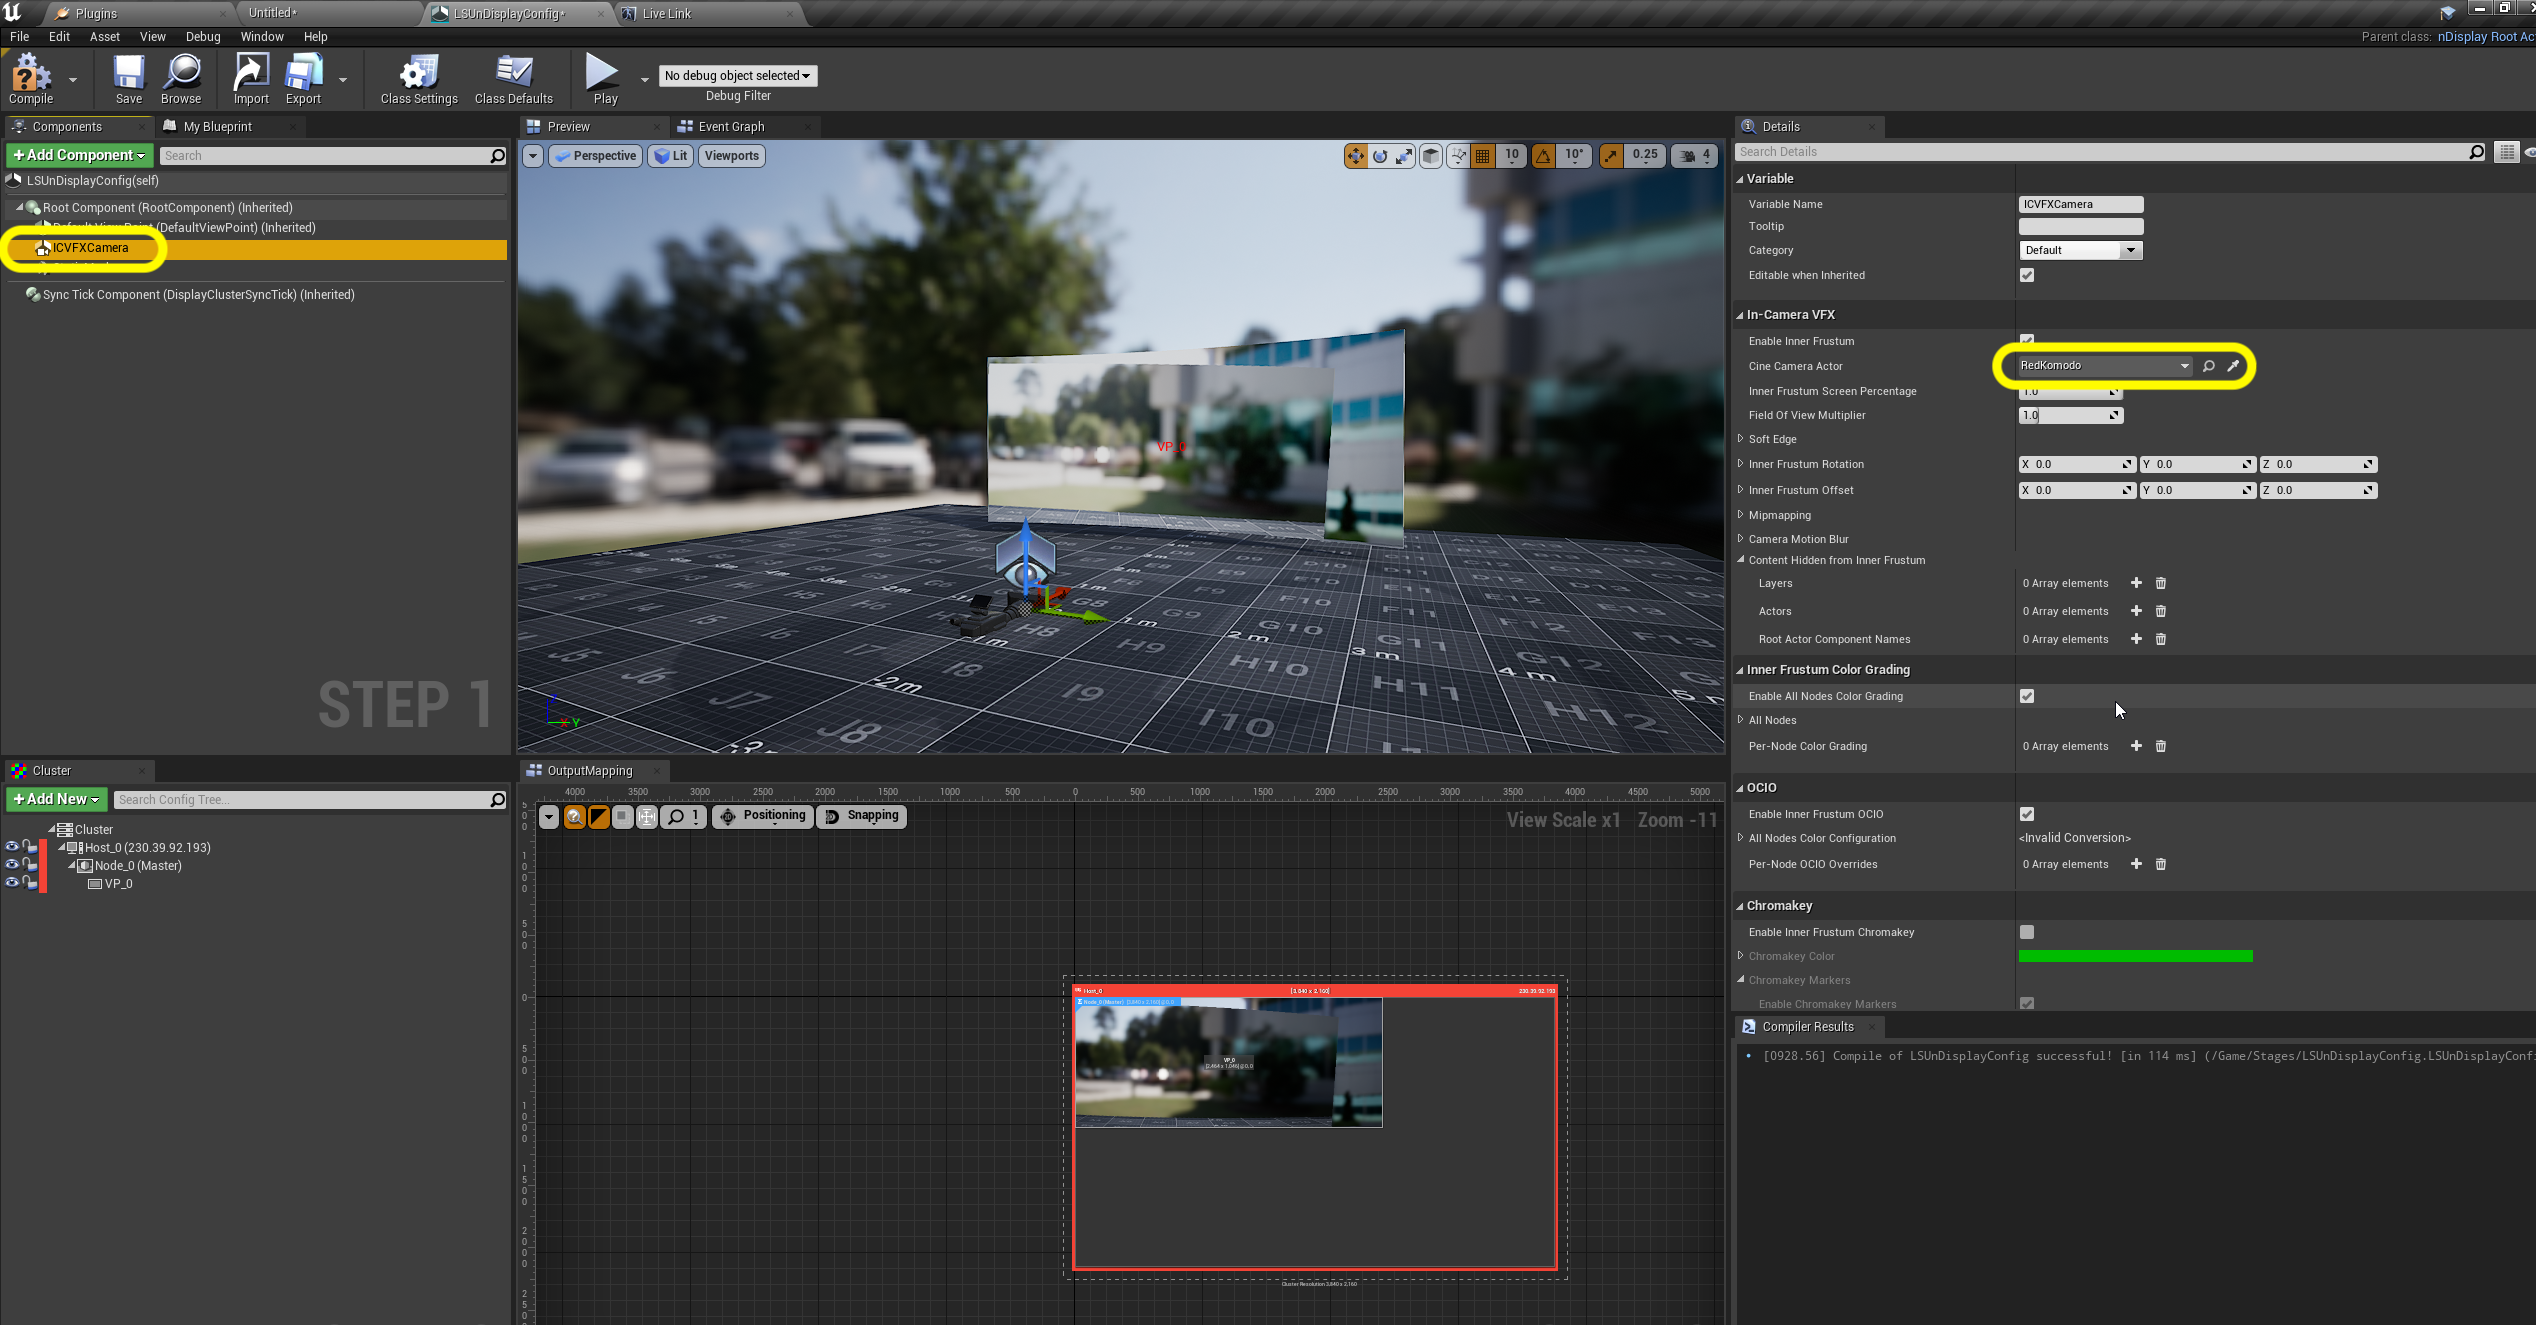
Step 18.|BTS|
Now do the same thing with the LSUnDisplayConfig in game and click on the ICVFX camera and assign the Red Komodo as the camera there as well.
Step 19.|BTS|
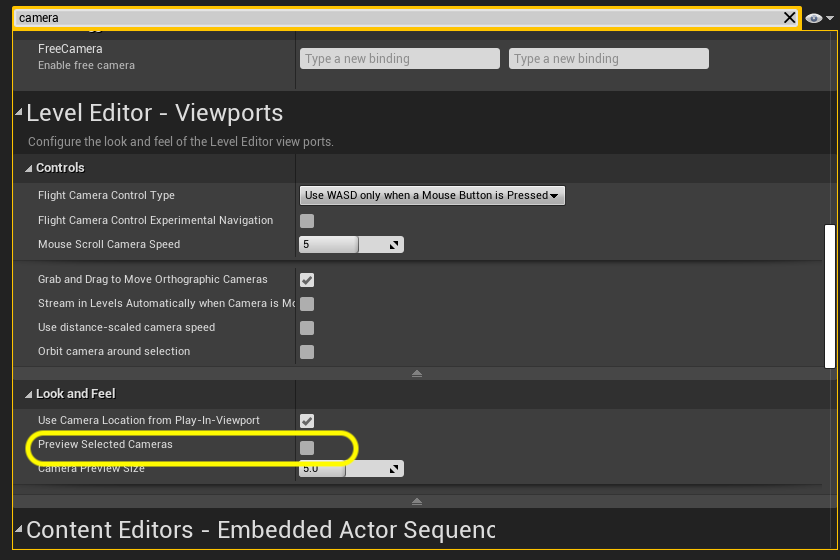
Go to Edit | Editor Preferences and go to Level Editor - Viewports | Look and Feel | and turn off Preview Select Cameras
Step 20.|BTS|
Adjust the camera settings. Our Red Komodo has a Sensor Width of 27.03 mm, a Sensor Height of 14.26 mm when shooting at 6K (6244 x 3250).
It's useful to note that that if the camera is set to UHD (16:9 instead of 17:9) our sensor size is 26.63 x 14.98 mm. You can use these calculators to determine proportion of the sensor being used for given resolutions: https://www.scantips.com/lights/cropfactor3.html.
The current lens on the camera today is a Canon EF 16mm - 35mm 2.8. These values need to change for each lens. It has a Min Focal Length of 16.0 mm, a Max Focal Length of 35 mm, a MinFStop of 2.8, a Max FStop of 22.6 and a Diaphragm Blade Count of 8.